Author Topic: FF7 PSX pre-rendered backgrounds to replacing the ones of FF7 PC version?  (Read 79761 times)

frivol

  • *
  • Posts: 43
    • View Profile
Aali but the background I edited is not being dispayed in the game, that´s one of the reasons why I was not understanding what you said, I even thought your driver was loading the old background instead the edited one (as a way to fix any problem related to backgrounds) althought I understand now that it makes not sense since there is a modified background file in the flevel lgp calling the new edited pngs allocated in the Textures folder, so I do not understand what is happening or what I´m doing wrong. What should I do to get my edited background working in game?

As I said you cannot just resize the image.  You need to use layer masks in PS and you should not use adobe resizer.  If this task is to be done, Genuine Fractals is the only option.

DLPB I tried with onOne Perfect Resizer (previously known by the name "Genuine Fractals"), so this is the same plugin you are talking about (which I have used for the last year and I love it) but I still get a not matching background with green lines, I have tried some different methods such us trying to convert all layers to a single smart object and resize them all together which seems to work,but actually don´t because you can not get back your layers properly resized. But a lot of people here is talking about layer masks and I´m not sure what you guys mean with that, I´m going to google it anyway, but still I will be gratefull if you tell me what you mean exactly with layer masks.

Thnx in advance!!
« Last Edit: 2011-02-27 12:29:33 by frivol »

Aali

  • *
  • Posts: 1196
    • View Profile
You dont need to modify files in flevel.lgp anymore. Field files can be replaced via modpath. Basically whatever show_missing_textures is asking for will be loaded if you provide it.

DLPB_

  • Banned
  • *
  • Posts: 11006
    • View Profile
If you are doing what I think you are, it will never work.  If you resize any individual part, they will come out being non uniform to each other.  These differences will be a problem.

The way I would assume to do it (ask sl1982 he has done it) is to resize the whole picture as 1, and THEN cut out the pieces from the completed picture.  That way you have used resize on the WHOLE picture AND THEN cut out the pieces.

I might be talking crap there.  Sl1982, you're on  :mrgreen:

sl1982

  • Administrator
  • *
  • Posts: 3764
  • GUI Master :P
    • View Profile
Step 1: Remove all traces of flourescent green from the images
Step 2: Figure out where there should be pure black that has been interpreted by palmer as transparent. Fill these in with black
Step 3: Take all the layers from each png and put them in the main background image, making sure to keep them as layers.
Step 4: For each layer you need to select everything that is non transparent and save the selection.
Step 5: Merge all layers
Step 6: Resize with your preferred resizer
Step 7: Load each saved selection and cut them into their own layers
Step 8: Make each layer into its own PNG image and save them according to the original file names
Step 9: Profit

DLPB_

  • Banned
  • *
  • Posts: 11006
    • View Profile
yeah I knew that.   ;D

Basically, it is a shit load of work.... and not as easy as simple resize = success.

Aali

  • *
  • Posts: 1196
    • View Profile
Step 2: Figure out where there should be pure black that has been interpreted by palmer as transparent. Fill these in with black

When does this happen? Its not supposed to get it wrong.

sl1982

  • Administrator
  • *
  • Posts: 3764
  • GUI Master :P
    • View Profile
I cannot remember offhand when it happened, and honestly I am not sure if they even need to be filled in with black or not, but that was just one of the steps that I used. The only reason I thought it may be wrong as the transparent pixels were on the main background image and in the middle of the image itself.

frivol

  • *
  • Posts: 43
    • View Profile
Thank you all very much for taking the time to respond and help me with this. After following most of the steps that sl1982 provided -which I combined with some other tricks-, I get now a perfectly resized and matching background, but I´m still getting the "missing textures" msg, and I´m unable to understand why it is missing (sorry that I´m so noob  :-\). To clarify this, I´ll put here the steps I´m following, with some images that will help me to explain my problem in a better way:

1- In Palmer I open "md1stin" file (train station, the first background we see in the game)

2- I hit on "Export PNG from layer" (still in palmer) and then I get 4 different PNG files (from "md1stin_0_00000000.png" to "md1stin_0_00000516.png")

3- Now the resizing/editing process in photoshop:


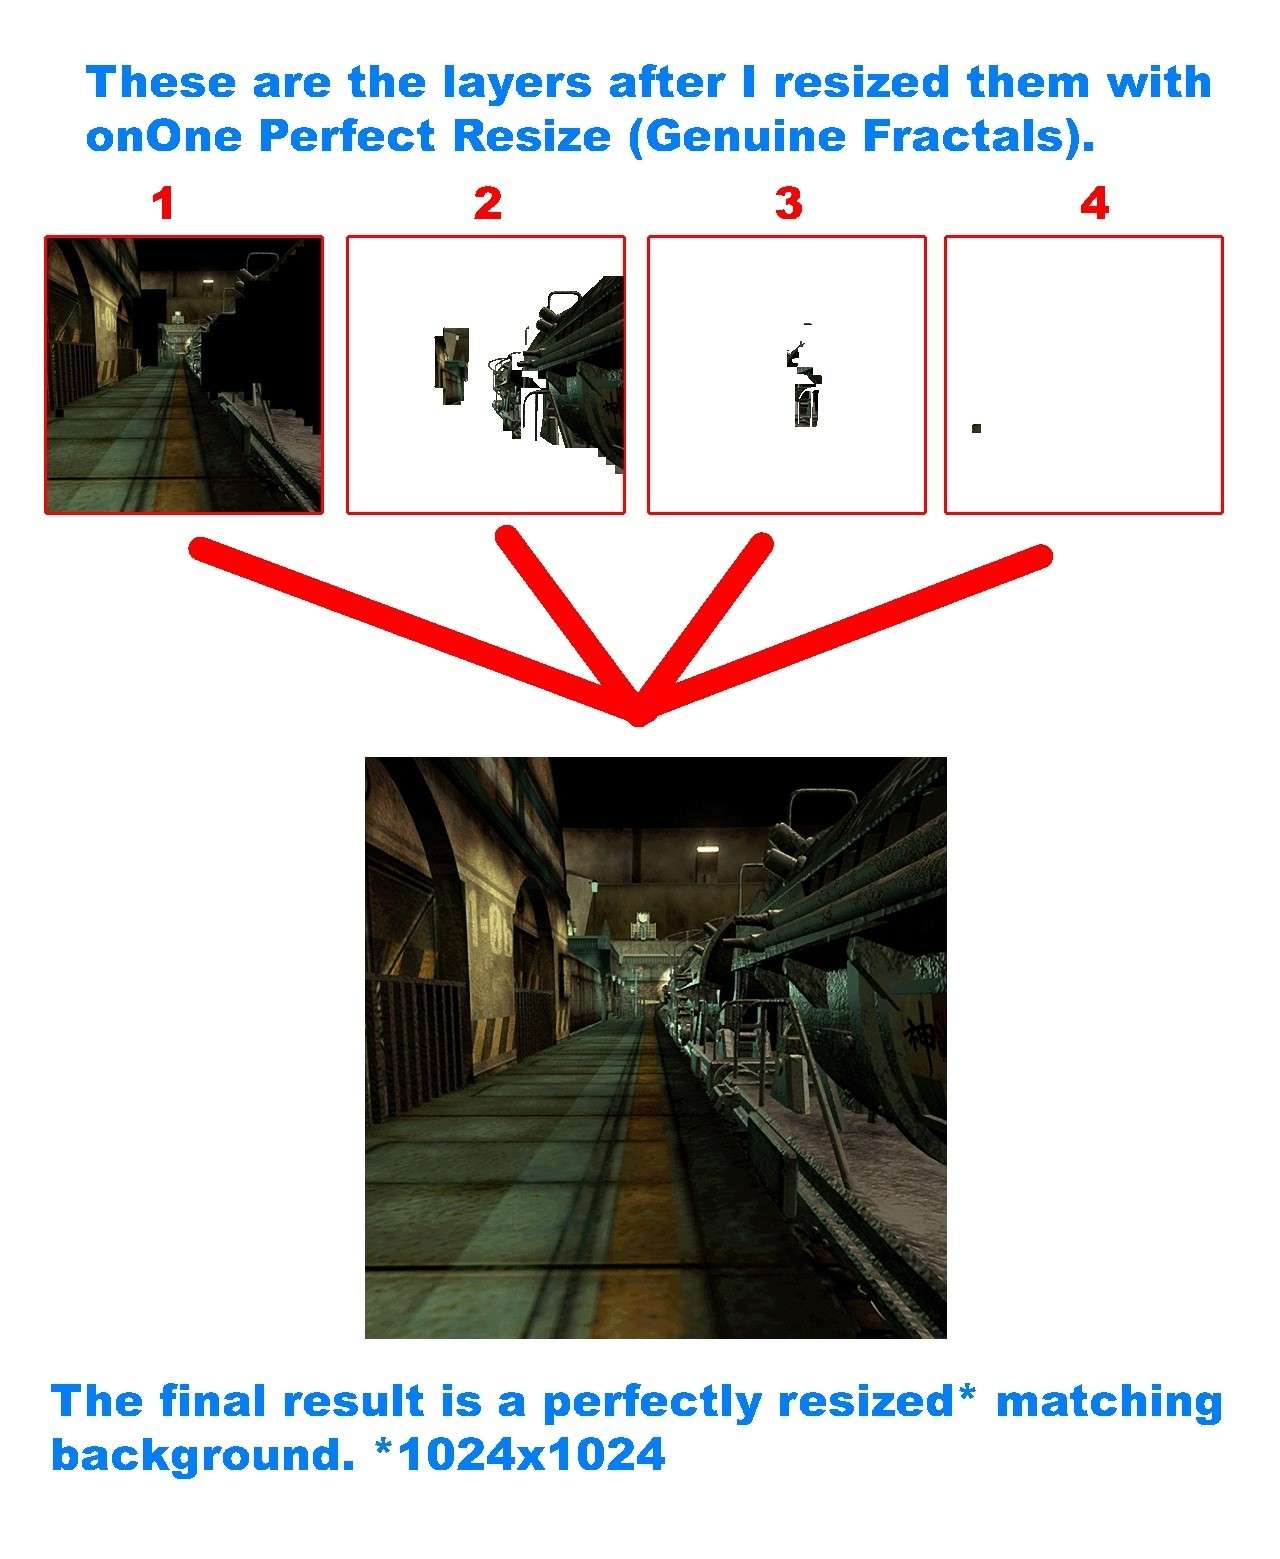
4- After a successful background resizing, I overwrite the old PNGs with the modified layers I got in Photoshop.

5- In Palmer again (I had not closed the program before), I hit on "Import PNG to layer" so I get my resized background sucessfully Imported.

6. Now, still in Palmer, I hit on "Save Field file", so I get 5 new different PNG files (from "md1stin_00_00.png" to "md1stin_04_00.png") and a field file ("md1stin") which will replace the old one.

7. I copy the field file ("md1stin") inside the folder "flevel" ("...\Final Fantasy VII\direct\flevel") and the new PNG files I got inside the "textures" folder ("...\Final Fantasy VII\textures").

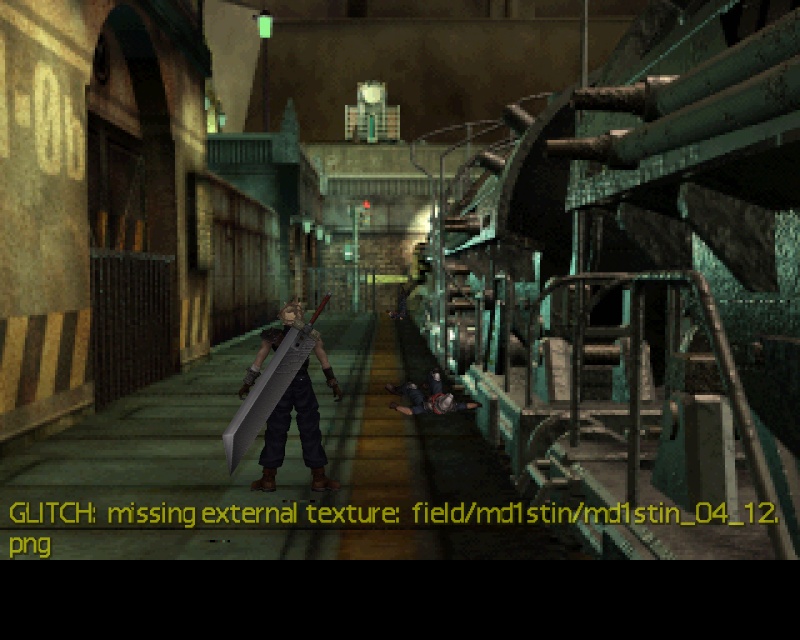
8. Finally I run the game and I get the "missing textures" msg, and I noticed the game is loading the old background because I did put one big red text on it in one of my previous attempts. So I´m lost, I thought I was doing things right, but I guess I´m definitely doing something wrong.


Thnx again for all the help you are giving me!  :)

Aali

  • *
  • Posts: 1196
    • View Profile
You shouldn't use the field file palmer produces, its not necessary anymore. Just put the PNGs it creates in mods/<your modpath>/field/md1stin/

frivol

  • *
  • Posts: 43
    • View Profile
YAY!! I finally got it working, Thank you so much Aali!! The problem was the path, I even did not notice that the "missing textures" msg was giving me the path itself, my bad lol!!  :roll:

Thank you again guys, I hope this thread help more ppl.
« Last Edit: 2011-02-28 08:46:53 by frivol »

DLPB_

  • Banned
  • *
  • Posts: 11006
    • View Profile
Yeah the app log shows you what is needed :)  if you used fractals, please upload your png so I can see.

frivol

  • *
  • Posts: 43
    • View Profile
Sure! This is how it looks when I collapse all layers, but I need to improve it since it was only a simple resizing with some other little editing to test all this.

(1024*1024 - I tried 2046*2046 but Palmer does not let me import it.)


(I would like to show an ingame picture when I do a better attempt with this resizing/editing thing, this one doesn´t like me so much).


Vgr

  • Global moderator
  • *
  • Posts: 2163
  • If it quacks like a duck, it must be a duck
    • View Profile
If this works ingame with the same quality as it is, I think you should start a new thread in Team Avalanche forum since I believe this will be very good.

sl1982

  • Administrator
  • *
  • Posts: 3764
  • GUI Master :P
    • View Profile
Avalanche is for recreating graphical effects, not just applying a filter.

Vgr

  • Global moderator
  • *
  • Posts: 2163
  • If it quacks like a duck, it must be a duck
    • View Profile
Yeah, but isn't it to tweak FF7 to make it look better? This is from this idea I came...

sl1982

  • Administrator
  • *
  • Posts: 3764
  • GUI Master :P
    • View Profile
Yeah, but isn't it to tweak FF7 to make it look better? This is from this idea I came...

Yes, but done a certain way. This is also the reason the FMV restoration is not a part of avalanche.

Vgr

  • Global moderator
  • *
  • Posts: 2163
  • If it quacks like a duck, it must be a duck
    • View Profile

DLPB_

  • Banned
  • *
  • Posts: 11006
    • View Profile
No I meant upload the files so that I can use them in my game.  :mrgreen:

frivol

  • *
  • Posts: 43
    • View Profile
This is the best I could do on this first background, it does not look perfect in game but (IMHO) still much better than the older one which was very pixelated.

I´ve mainly used the plugins "Perfect Resize" (Genuine Fractals) and  "NoiseNinja", a very good solution to removing noise and grain from images among other things to improve the background. So this is the final result:


No I meant upload the files so that I can use them in my game.  :mrgreen:

Oh sure here they are DLPB:

http://www.megaupload.com/?d=U0HKV70M

Timber

  • *
  • Posts: 386
    • View Profile
This is the best I could do on this first background, it does not look perfect in game but (IMHO) still much better than the older one which was very pixelated.
I´ve mainly used the plugins "Perfect Resize" (Genuine Fractals) and  "NoiseNinja", a very good solution to removing noise and grain from images among other things to improve the background. So this is the final result:

Your previous pic looked MUCH better than that one.
Personally I think just sticking to resizing will have the best results, any noise filters and such are just going to reduce the detail too much.

Roxas

  • *
  • Posts: 157
    • View Profile
    • ReBoot Revival
Hm, gave it a try in-game:

Original:


frivol's resize:


Hope you don't mind my testing them, frivol. :)

Covarr

  • Covarr-Let
  • Administrator
  • *
  • Posts: 3941
  • Just Covarr. No "n".
    • View Profile
This is the best I could do on this first background, it does not look perfect in game but (IMHO) still much better than the older one which was very pixelated.
I´ve mainly used the plugins "Perfect Resize" (Genuine Fractals) and  "NoiseNinja", a very good solution to removing noise and grain from images among other things to improve the background. So this is the final result:

Your previous pic looked MUCH better than that one.
Personally I think just sticking to resizing will have the best results, any noise filters and such are just going to reduce the detail too much.
I agree. The first one you posted looked nice and sharp, but still dirty, gritty, and detailed. Absolutely perfect for Midgar. The second one looks far too clean, and fake.

Sometimes, less is more. In this case, less noise removal is more detail kept.

DLPB_

  • Banned
  • *
  • Posts: 11006
    • View Profile
The first one is miles better.  Don't bother with filters.  Stick with fractals resize + fractals sharpener and sometimes manually edit things that look bad like light.

frivol

  • *
  • Posts: 43
    • View Profile
Yeah guys I know the first one looks more realistic and the second one is too clean so it looks fake, but in game the first one looks terrible, even worse than the original pixelated one. The thing is that working on this background is not that easy since this background looks much closer in game and the sharpen effect looks very ugly when you zoom in the image that much. So I guess I´ll just set the fractals sharpener off and see how it looks in game otherwise it will looks terrible (i already tried it).

I´ll try that later when I get home from work, and I will upload it so you guys can choose between both versions.

Hm, gave it a try in-game:

I cant see the pics :(

Hope you don't mind my testing them, frivol. :)

No problem at all!  :D

« Last Edit: 2011-03-01 14:50:12 by frivol »

DLPB_

  • Banned
  • *
  • Posts: 11006
    • View Profile
It doesnt look worse to me, it is prob due to your resolution.  Upload the files of the old one you did and I will see what it looks like to me :)