
26
Scripting and Reverse Engineering / Re: FF7 World/Field Map Scripts and Encounters
« on: 2019-02-05 04:12:35 »
I made a bit of a discovery on my quest to better understand the world map scripts. Let me first explain about some stuff that is already known and in the wiki as a primer to my later-mentioned discoveries. I extracted an EV-type file out of Section 4 of the WM0.TXZ file (as described here). One first thing to note is that it is definitely NOT a copy of the WM0.EV file as the wiki suggests, but I haven't dug into exactly how or what is different about it, this will probably be something I investigate soon. An EV file contains a call table which is a listing of all the functions/scripts that exist on the world map.
There are 3 types of scripts:
I mostly want to dive into the walkmesh calls, because I've been on a quest to figure out how your character transitions back and forth between the world map and field maps, and I have figured this out.
For each walkmesh call, there is also a set of coordinates attached to it, so it knows to execute only the portion of code that pertains to the area you're in. The coordinates here are NOT the coordinates on the world map, but instead it is the mesh coordinate. The world map is divided into exactly 1,008 equal squares (meshes), 28x36 meshes. So the coordinates here will be 0-27 and 0-35. Not all meshes have a script associated with it, but a few do. We'll come back to coordinates later.
I'm looking specifically for code that deals with jumping to field maps, and it just so happens that there is one opcode that handles this, and many of them are called within these Walkmesh calls, the problem is, the opcode takes in two byte-size parameters, call them parameter A and B. Parameter A is a number that never exceeds 0x40 and the parameter B is either a 0 or 1. Field map IDs range from 0-768, so this exceeds the possible values that could come from these 2 parameters. So, what are these numbers? And how do they eventually reach a field map?
Moving back to the mesh coordinate system, I took the world map image from Black Chocobo and split it into a 28x36 grid. I then took all the Walkmesh calls that contained a field map jump code and put a letter/symbol up on the world map at the coordinate that the call occurs and I came up with this map:
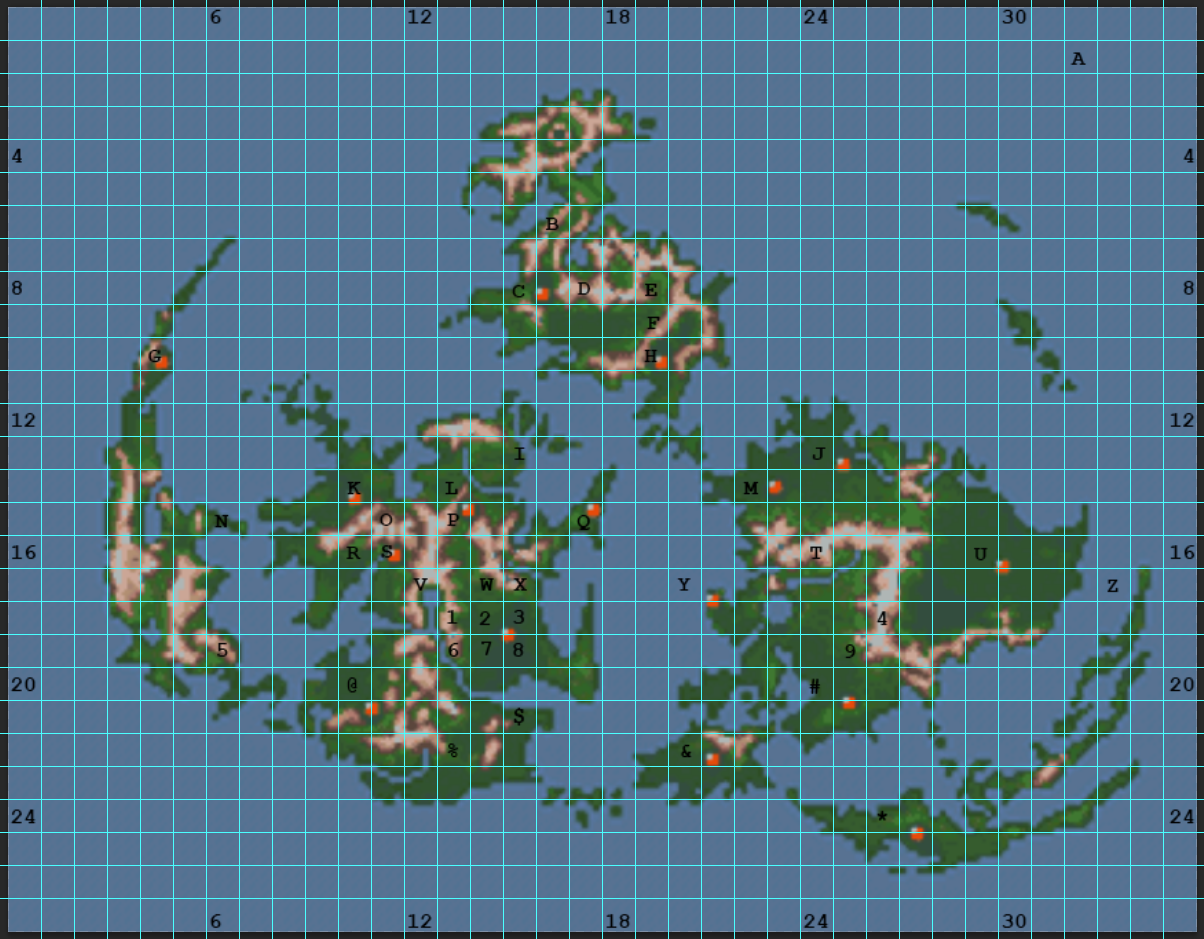
The first thing you can notice is that all the spots you see marked are all places we all recognize as points of entry into the various towns on the map. (Note: You'll see that some of them seem to be slightly off, we can definitely attribute this to the world map image from Black Chocobo not being the absolute source of truth, but instead a good guide to point us in the right direction) What I then decided to do was to start with the code that has a parameter A of 1, which is notated on the map as 'M' (Midgar), then the code where parameter A is 2, which is 'J' (Kalm). I made a list and kept going:
Notice a pattern? It's the same exact list that DynamixDJ posted earlier in this thread, all 64 (or the ones that exist) match up exactly with the WM* field maps. This is definitely interesting, but still not enough information to land us to how the game gets us to the final destination since the data contained within those WM*.DAT files (which are all identical byte-for-byte) is not enough space to fit all the scripting required to tell the game where to jump to for all 64 cases. Instead, I took note of all the field map names and Field IDs of where these SHOULD be going, then searching the binary to see if I see those same values anywhere. Here's the list I started:
I then found the FIELD.TBL file located within the /WORLD/ folder and it starts like this:
If you notice, the first line contains 00AA, second line contains 014F, and so on thru the previous list, all of them at offset 0x6. This file is just the map we are looking for! When the opcode for jumping to field maps is called, it uses parameter A as what I call a Field Table Id, which is an ID value associated with records in this file. There are 24 bytes per record. The only thing left is to figure out what the second parameter B is. Most of the time it is 0, but sometimes it is a 1. In the case of the Chocobo Farm, the code looks like this:
Most of this you can ignore, but note the two possible ways to jump to the field map, notice one has a parameter B of 0, and the other 1. Parameter B indicates whether an alternate scenario should occur. If we look back at the 3rd record of the FIELD.TBL file, you'll notice that the second half of the bytes aren't zero like some of the other records. That is because these records can be split into 2 12-byte pieces, each containing a potentially different Field ID to jump to, in this case it's the same. What's interesting in the Chocobo Farm case, is that the first time we enter the farm, we enter from the bottom of the screen, while subsequent times we enter from the right side. This FIELD.TBL file is how it handles that. I'm not exactly sure how, but somewhere in the remaining 10 bytes of each scenario are the coordinates that the character should begin on. An example of one area potentially leading to a completely different field map is North Corel. This ONLY happens if you fail to stop the train during your mission there, you instead are transported to a map that has the crashed train in it.
And there you have it, the mystery of transporting from the WM to a field map is solved. And all my findings have already been added to the wiki.
For those curious: I've made a list of all possible field maps that can lead to the world map (left side of the wm field), and all the ways you can get back to a field map (right side of the wm field), sorry for the formatting:
Another discovery I found was that of the Model calls (as described near the top of this post), some of the Model IDs are already known, such as Cloud being ID = 0, Tifa = 1, Cid = 2, Highwind = 11, etc. Basically all 3D models used on the WM have an ID. Previously ID 8 was unknown, but I found that to be the Cargo Ship as there is a Model script for ID 8 that deals with all 4 field map jumps pertaining to the Cargo Ship transports.
Thru similar reverse engineering, we can see that wm52 and fr_e are used for the Diamond Weapon battle and the dialogue that follows. This also illuminates another unknown Model ID, which Diamond Weapon is ID 10.
Another area of interest is wm32 is where Yuffie Encounters end up after the battle. wm34 is where Yuffie betrays your team on the southern part of the western continent.
What I don't know is how the game knows which coordinates on the world map to drop the character when entering the WM from a particular town. For the sake of my current project, finding that is out of scope for now, but possibly something I may dive into later.
There are 3 types of scripts:
- a system call - which will be called by various game functions, like when the world map is loaded or every frame tick (likely for things like animations of the water)
- a model call - which will be scripts that are called by models, like when a model is loaded onto the map (like a Chocobo or the Highwind, etc)
- a walkmesh call - which is called when your character enters a specific square on the world map
I mostly want to dive into the walkmesh calls, because I've been on a quest to figure out how your character transitions back and forth between the world map and field maps, and I have figured this out.
For each walkmesh call, there is also a set of coordinates attached to it, so it knows to execute only the portion of code that pertains to the area you're in. The coordinates here are NOT the coordinates on the world map, but instead it is the mesh coordinate. The world map is divided into exactly 1,008 equal squares (meshes), 28x36 meshes. So the coordinates here will be 0-27 and 0-35. Not all meshes have a script associated with it, but a few do. We'll come back to coordinates later.
I'm looking specifically for code that deals with jumping to field maps, and it just so happens that there is one opcode that handles this, and many of them are called within these Walkmesh calls, the problem is, the opcode takes in two byte-size parameters, call them parameter A and B. Parameter A is a number that never exceeds 0x40 and the parameter B is either a 0 or 1. Field map IDs range from 0-768, so this exceeds the possible values that could come from these 2 parameters. So, what are these numbers? And how do they eventually reach a field map?
Moving back to the mesh coordinate system, I took the world map image from Black Chocobo and split it into a 28x36 grid. I then took all the Walkmesh calls that contained a field map jump code and put a letter/symbol up on the world map at the coordinate that the call occurs and I came up with this map:
The first thing you can notice is that all the spots you see marked are all places we all recognize as points of entry into the various towns on the map. (Note: You'll see that some of them seem to be slightly off, we can definitely attribute this to the world map image from Black Chocobo not being the absolute source of truth, but instead a good guide to point us in the right direction) What I then decided to do was to start with the code that has a parameter A of 1, which is notated on the map as 'M' (Midgar), then the code where parameter A is 2, which is 'J' (Kalm). I made a list and kept going:
- M - Midgar
- J - Kalm
- U - Chocobo Farm
- 4 - Mythril Mine (Marsh side)
- 9 - Mythril Mine (Condor side)
- # - Fort Condor
- Y - Junon
- & - TOTA
- T - Sleeping Man
Notice a pattern? It's the same exact list that DynamixDJ posted earlier in this thread, all 64 (or the ones that exist) match up exactly with the WM* field maps. This is definitely interesting, but still not enough information to land us to how the game gets us to the final destination since the data contained within those WM*.DAT files (which are all identical byte-for-byte) is not enough space to fit all the scripting required to tell the game where to jump to for all 64 cases. Instead, I took note of all the field map names and Field IDs of where these SHOULD be going, then searching the binary to see if I see those same values anywhere. Here's the list I started:
- M - 170 - 0x00AA - Midgar
- J - 335 - 0x014F - Kalm
- U - 343 - 0x0157 - Chocobo Farm
- 4 - 350 - 0x015E - Mythril Mine (Marsh side)
- 9 - 349 - 0x015D - Mythril Mine (Condor side)
- # - 353 - 0x0161 - Fort Condor
- Y - 428 - 0x01AC - Junon
- & - 600 - 0x258 - TOTA
- T - 78 - 0x004E - Sleeping Man
I then found the FIELD.TBL file located within the /WORLD/ folder and it starts like this:
Code: [Select]
C7 02 8C F6 10 00 AA 00 84 84 84 84 00 00 00 00 00 00 00 00 00 00 00 00
01 FE B2 FC 77 00 4F 01 74 74 74 74 00 00 00 00 00 00 00 00 00 00 00 00
1E 02 E5 FB 0A 00 57 01 98 98 98 98 EF 04 B9 05 4F 00 57 01 CC CC CC CC
6C 02 CA 02 73 00 5E 01 00 00 00 00 00 00 00 00 00 00 00 00 00 00 00 00
AF 00 08 00 17 00 5D 01 30 30 30 30 00 00 00 00 00 00 00 00 00 00 00 00
0B 00 DF FD 09 00 61 01 80 80 80 80 00 00 00 00 00 00 00 00 00 00 00 00
A9 02 9A 02 1D 00 AC 01 CC CC CC CC 00 00 00 00 00 00 00 00 00 00 00 00
FA 01 59 FA 00 00 58 02 80 80 80 80 00 00 00 00 00 00 00 00 00 00 00 00
02 00 1A 00 03 00 4E 00 80 80 80 80 00 00 00 00 00 00 00 00 00 00 00 00
If you notice, the first line contains 00AA, second line contains 014F, and so on thru the previous list, all of them at offset 0x6. This file is just the map we are looking for! When the opcode for jumping to field maps is called, it uses parameter A as what I call a Field Table Id, which is an ID value associated with records in this file. There are 24 bytes per record. The only thing left is to figure out what the second parameter B is. Most of the time it is 0, but sometimes it is a 1. In the case of the Chocobo Farm, the code looks like this:
Code: [Select]
Walkmesh(16, 29).FunctionType(4)
IF ((((GetSpecial(0008) == #0000) || (GetSpecial(0008) == #0001)) || (GetSpecial(0008) == #0002))) {
  IF (Bank0[007d].Bit(0)) {
    EnterFieldScene(#0003, #0001)
    GOTO Label 1
  }
  EnterFieldScene(#0003, #0000)
Label 1:
  GOTO Label 2
}
IF ((GetSpecial(0008) == #0013)) {
  WRITE Bank0[007e].Bit(0) = #0000
  WRITE Bank0[007e].Bit(2) = #0000
  WRITE Bank0[007e].Bit(3) = #0000
  WRITE Bank0[007e].Bit(4) = #0000
  WRITE Bank0[007e].Bit(5) = #0000
  WRITE Bank0[007e].Bit(6) = #0000
  WRITE Bank0[007e].Bit(1) = #0000
  WRITE Bank0[007c] = #0000
  IF (Bank0[007d].Bit(0)) {
    EnterFieldScene(#0003, #0001)
    GOTO Label 2
  }
  EnterFieldScene(#0003, #0000)
}
Label 2:
RETURN
Most of this you can ignore, but note the two possible ways to jump to the field map, notice one has a parameter B of 0, and the other 1. Parameter B indicates whether an alternate scenario should occur. If we look back at the 3rd record of the FIELD.TBL file, you'll notice that the second half of the bytes aren't zero like some of the other records. That is because these records can be split into 2 12-byte pieces, each containing a potentially different Field ID to jump to, in this case it's the same. What's interesting in the Chocobo Farm case, is that the first time we enter the farm, we enter from the bottom of the screen, while subsequent times we enter from the right side. This FIELD.TBL file is how it handles that. I'm not exactly sure how, but somewhere in the remaining 10 bytes of each scenario are the coordinates that the character should begin on. An example of one area potentially leading to a completely different field map is North Corel. This ONLY happens if you fail to stop the train during your mission there, you instead are transported to a map that has the crashed train in it.
And there you have it, the mystery of transporting from the WM to a field map is solved. And all my findings have already been added to the wiki.
For those curious: I've made a list of all possible field maps that can lead to the world map (left side of the wm field), and all the ways you can get back to a field map (right side of the wm field), sorry for the formatting:
Code: [Select]
fromMapId 	name 	menuText 	fieldTableId 	wmField 	toMapId 	name 	menuText
NULL	NULL	NULL	1	wm0	170	mds5_5	Slum Outskirts
170	mds5_5	Slum Outskirts	1	wm0	170	mds5_5	Slum Outskirts
335	elm	Kalm	2	wm1	335	elm	Kalm
345	frcyo	Chocobo Ranch	3	wm2	343	farm	Chocobo farm
343	farm	Chocobo farm	3	wm2	343	farm	Chocobo farm
350	psdun_2	Mythril Mine	4	wm3	350	psdun_2	Mythril Mine
349	psdun_1	Mythril Mine	5	wm4	349	psdun_1	Mythril Mine
353	condor1	Base of Fort Condor	6	wm5	353	condor1	Base of Fort Condor
370	junonl1	Lower Junon	7	wm6	428	ujunon1	Under Junon
428	ujunon1	Under Junon	7	wm6	428	ujunon1	Under Junon
600	jtempl	Temple of the Ancients	8	wm7	600	jtempl	Temple of the Ancients
78	zz1	Old man's house	9	wm8	78	zz1	Old man's house
79	zz2	Weapon seller	A	wm9	79	zz2	Weapon seller
712	itown1a	Mideel	B	wm10	712	itown1a	Mideel
712	itown1a	Mideel	B	wm10	714	itown1b	Mideel
713	itown12	Mideel	B	wm10	712	itown1a	Mideel
713	itown12	Mideel	B	wm10	714	itown1b	Mideel
714	itown1b	Mideel	B	wm10	712	itown1a	Mideel
714	itown1b	Mideel	B	wm10	714	itown1b	Mideel
84	zz7	Materia Cave	C	wm11	84	zz7	Materia Cave
443	del2	Costa del Sol	D	wm12	443	del2	Costa del Sol
458	mtcrl_0	Mt. Corel	E	wm13	458	mtcrl_0	Mt. Corel
450	ncorel	North Corel	F	wm14	450	ncorel	North Corel
450	ncorel	North Corel	F	wm14	451	ncorel2	North Corel
451	ncorel2	North Corel	F	wm14	450	ncorel	North Corel
451	ncorel2	North Corel	F	wm14	451	ncorel2	North Corel
452	ncorel3	North Corel	F	wm14	450	ncorel	North Corel
452	ncorel3	North Corel	F	wm14	451	ncorel2	North Corel
481	desert1		10	wm15	482	desert2	Corel Desert
482	desert2	Corel Desert	10	wm15	482	desert2	Corel Desert
512	crcin_2	Waiting Room	10	wm15	482	desert2	Corel Desert
518	gongaga	Gongaga Village	11	wm16	515	gonjun2	Jungle
514	gonjun1	Jungle	11	wm16	515	gonjun2	Jungle
515	gonjun2	Jungle	11	wm16	515	gonjun2	Jungle
525	cos_btm	Cosmo Canyon	12	wm17	525	cos_btm	Cosmo Canyon
284	nivl_3	Nibelheim	13	wm18	284	nivl_3	Nibelheim
285	nivl_4		13	wm18	284	nivl_3	Nibelheim
551	rckt2	Rocket Town	14	wm19	551	rckt2	Rocket Town
551	rckt2	Rocket Town	14	wm19	557	rckt	Rocket Town
557	rckt	Rocket Town	14	wm19	551	rckt2	Rocket Town
557	rckt	Rocket Town	14	wm19	557	rckt	Rocket Town
81	zz4	Lucrecia's Cave	15	wm20	81	zz4	Lucrecia's Cave
83	zz6	Materia Cave	16	wm21	83	zz6	Materia Cave
574	yougan3	Plains	17	wm22	574	yougan3	Plains
574	yougan3	Plains	17	wm22	579	uutai1	Wutai
581	yufy1	Yuffie's House	17	wm22	574	yougan3	Plains
581	yufy1	Yuffie's House	17	wm22	579	uutai1	Wutai
579	uutai1	Wutai	17	wm22	574	yougan3	Plains
579	uutai1	Wutai	17	wm22	579	uutai1	Wutai
82	zz5	Materia Cave	18	wm23	82	zz5	Materia Cave
617	bonevil	Bone Village	19	wm24	617	bonevil	Bone Village
629	sandun_2	Corral Valley Cave	1A	wm25	629	sandun_2	Corral Valley Cave
654	snow	Icicle Inn	1B	wm26	654	snow	Icicle Inn
80	zz3	Mystery House	1C	wm27	80	zz3	Mystery House
85	zz8	Materia Cave	1D	wm28	85	zz8	Materia Cave
NULL	NULL	NULL	1E	wm29	425	semkin_5	Underwater Reactor
88	q_1	Hallway	1F	wm30	88	q_1	Hallway
348	sichi	Marshes	20	wm31	348	sichi	Marshes
573	yougan2	Plains	21	wm32	573	yougan2	Plains
572	yougan	Wilderness	22	wm33	572	yougan	Wilderness
NULL	NULL	NULL	23	wm34	572	yougan	Wilderness
382	jundoc1a	Junon Dock	24	wm35	439	shpin_2	Cargo Ship
440	shpin_3	Cargo Ship	25	wm36	441	del1	Costa del Sol Harbor
382	jundoc1a	Junon Dock	26	wm37	441	del1	Costa del Sol Harbor
429	ujunon2	Dolphin Offing	26	wm37	441	del1	Costa del Sol Harbor
441	del1	Costa del Sol Harbor	27	wm38	382	jundoc1a	Junon Dock
86	sea		28	wm39	NULL	NULL	NULL
70	fship_23	Highwind	29	wm40	NULL	NULL	NULL
406	subin_1b	Submarine Bridge	2A	wm41	NULL	NULL	NULL
284	nivl_3	Nibelheim	2B	wm42	284	nivl_3	Nibelheim
285	nivl_4		2B	wm42	284	nivl_3	Nibelheim
311	mtnvl2	Mt. Nibel	2C	wm43	311	mtnvl2	Mt. Nibel
70	fship_23	Highwind	2D	wm44	NULL	NULL	NULL
71	fship_24	Bridge	2D	wm44	NULL	NULL	NULL
72	fship_25	Highwind	2D	wm44	NULL	NULL	NULL
313	mtnvl4	Mt. Nibel	2E	wm45	313	mtnvl4	Mt. Nibel
NULL	NULL	NULL	2F	wm46	654	snow	Icicle Inn
658	hyou1		30	wm47	658	hyou1
662	icedun_2	Frostbite Cave	30	wm47	658	hyou1
NULL	NULL	NULL	31	wm48	NULL	NULL	NULL
NULL	NULL	NULL	32	wm49	70	fship_23	Highwind
NULL	NULL	NULL	32	wm49	72	fship_25	Highwind
NULL	NULL	NULL	33	wm50	72	fship_25	Highwind
NULL	NULL	NULL	34	wm51	71	fship_24	Bridge
NULL	NULL	NULL	35	wm52	347	fr_e
405	subin_1a		36	wm53	NULL	NULL	NULL
622	anfrst_3	Ancient Forest	37	wm54	622	anfrst_3	Ancient Forest
624	anfrst_5	Ancient Forest	37	wm54	622	anfrst_3	Ancient Forest
405	subin_1a		38	wm55	405	subin_1a
405	subin_1a		38	wm55	406	subin_1b	Submarine Bridge
406	subin_1b	Submarine Bridge	38	wm55	405	subin_1a
406	subin_1b	Submarine Bridge	38	wm55	406	subin_1b	Submarine Bridge
626	sango2	Corral Valley	39	wm56	626	sango2	Corral Valley
630	lost1	Forgotten Capital	3A	wm57	630	lost1	Forgotten Capital
NULL	NULL	NULL	3B	wm58	744	las0_1	Highwind, On deck
686	gaiafoot	Base of Gaea's Cliff	3C	wm59	686	gaiafoot	Base of Gaea's Cliff
670	move_s		3D	wm60	670	move_s
670	move_s		3E	wm61	670	move_s
670	move_s		3F	wm62	670	move_s
682	hyou12		40	wm63	682	hyou12
Another discovery I found was that of the Model calls (as described near the top of this post), some of the Model IDs are already known, such as Cloud being ID = 0, Tifa = 1, Cid = 2, Highwind = 11, etc. Basically all 3D models used on the WM have an ID. Previously ID 8 was unknown, but I found that to be the Cargo Ship as there is a Model script for ID 8 that deals with all 4 field map jumps pertaining to the Cargo Ship transports.
Thru similar reverse engineering, we can see that wm52 and fr_e are used for the Diamond Weapon battle and the dialogue that follows. This also illuminates another unknown Model ID, which Diamond Weapon is ID 10.
Another area of interest is wm32 is where Yuffie Encounters end up after the battle. wm34 is where Yuffie betrays your team on the southern part of the western continent.
What I don't know is how the game knows which coordinates on the world map to drop the character when entering the WM from a particular town. For the sake of my current project, finding that is out of scope for now, but possibly something I may dive into later.
