Author Topic: Model conversion Tutorial (56K WARNING!!!)(Not for Noobs)  (Read 28876 times)

squeeble

  • *
  • Posts: 423
  • GOOGLE GODDAMIT!!
    • View Profile
Ok everyone here is the tutorial you've all been waiting for. This won't be a technical support type thread so please don't ask me how do i do this or that.

[Squeeble's model conversion tuorial]

Program requirements: 3ds Max(I'm using 9),Kimera,Pc creator, phtoshop (or similar photo editing software),LGP tools and biturn. Also you may need irfanview its not a must but it is the program you will see me use for some things in this tutorial.

Prerequisites: A decent knowledge of max, and the FFX models set.

Step 1:Setting everything up
Ok start by creating a folder for all your FF7 mod files. Inside this folder create one folder called battle archives and another called adamantoise like so.
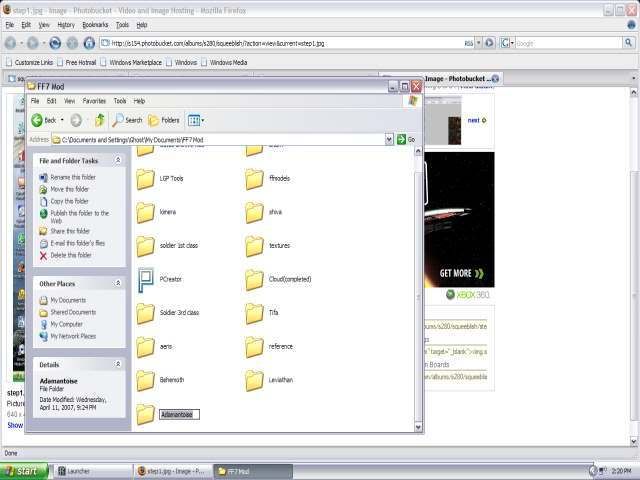
Now open LGP tools and open the battle LGP, and extract all files into the battle archives folder.
Now we need to locate the monster we'll be working on. Now for me this takes a while coz i have to manually search for the right files using leviathan and kimera. But for you today you just get the file names :lol: . So go into the battle archives folder and copy the files from gqaa-gqda and paste them into our adamantoise folder.
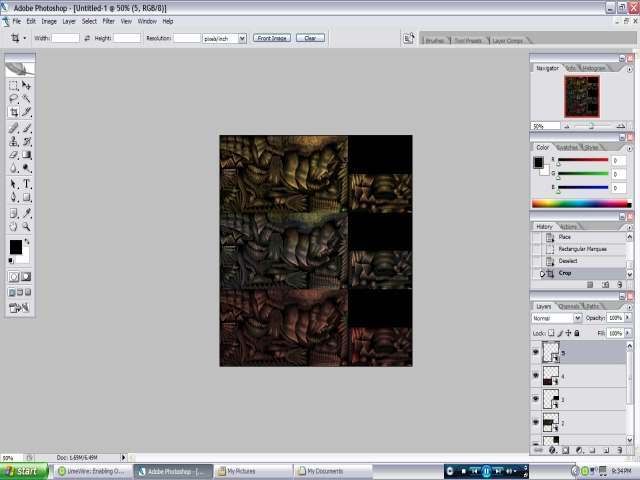
Next we want to fix the tuxture up so we dont have any problems later on. To do this we create a new image in photoshop, we want all the photos to fit squarely so make it 768x768. Then go file and place each of the files individually.
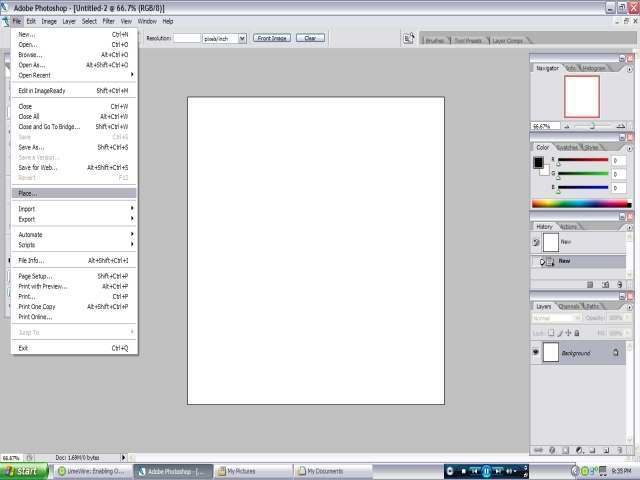
Until you get this.
Now for this step i use irfranview for it's ease but you could definitely use photoshop. So boot up your program of choice and resize the texture to 2048x512 then decrease the colour scale to 8bit, and save as bitmap.
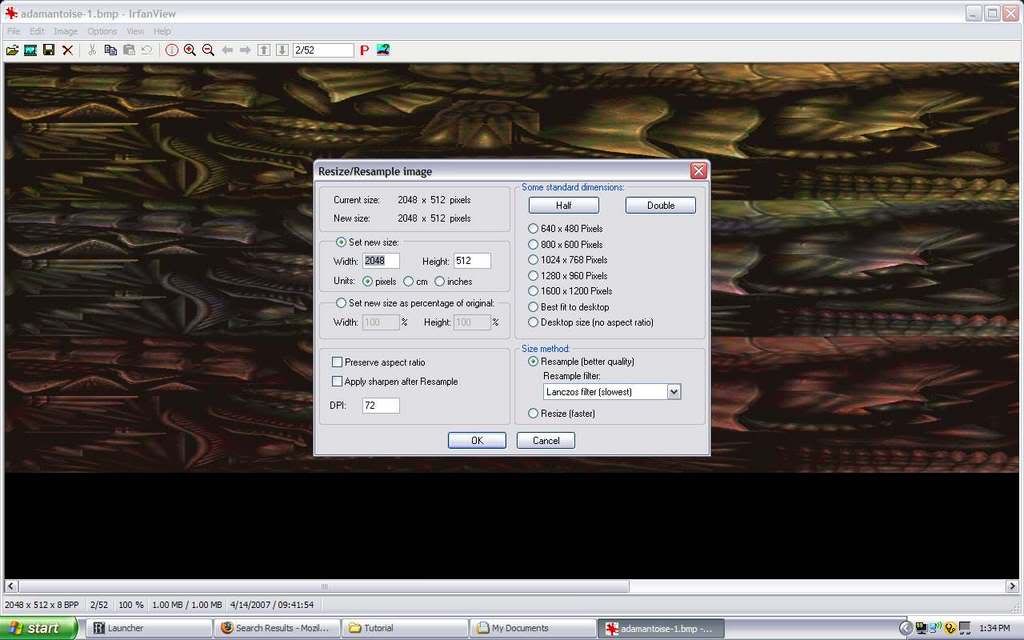
Now open biturn and go to the folder where we have our adamantoise files and convert the main file gqaa into a .3ds.
Yay things are now ready to get going.
Step 2:3ds Max
Now I'm not going to be telling people witch button to push to do what, so you will need to have a decent knowledge of the program to understand what im going on about.

Now boot up max and import the original adamantoise witch we converted from biturn, then import the one from FFX and resize the new one so it fits as closely to the original as possible.
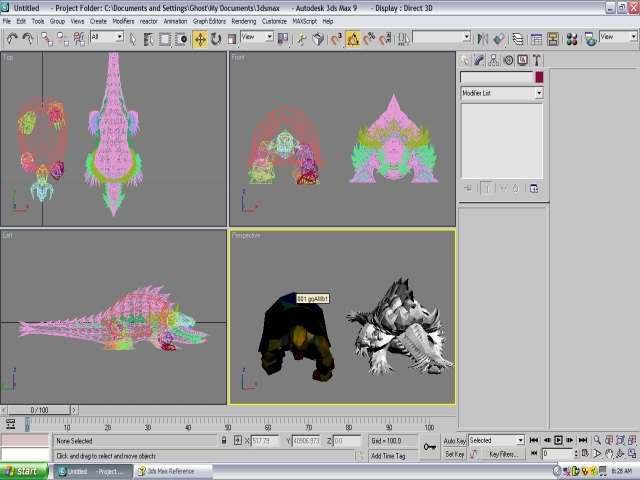
Big tip here: Always do the uv mapping first or you WILL be crying later on. Trust me i found out the hard way.
Now open up the material editor and make the diffuse map the bitmap witch we created earlier, and apply it to all parts of the model. Also apply a standard material to the other model to get rid of the horrible vertex shading, wich never looks right in max for some reason. Your scene should now look like this.
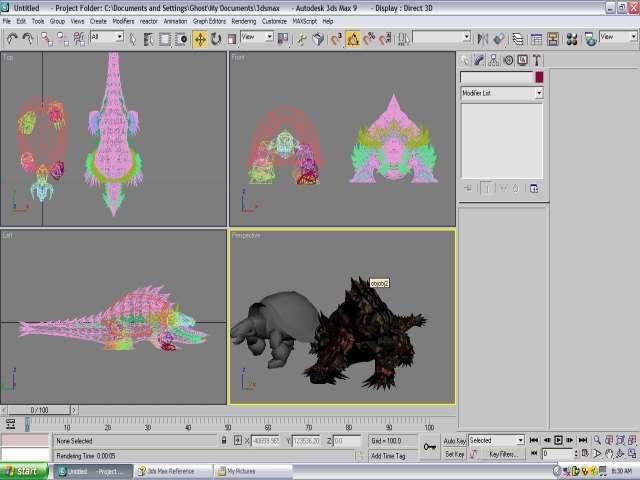
Now select everything in the scene and convert it to editable poly. Select a peice of our monster and go to the Unwrap UVW's in the modifier list.
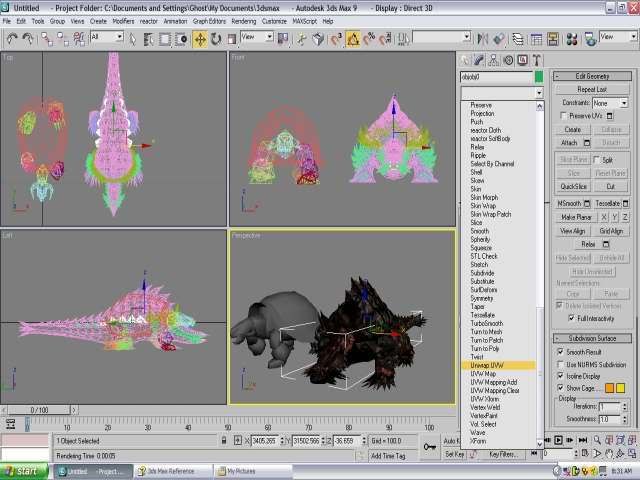
Choose select by face and press edit. When the edit screen comes up select everything you see on the screen.
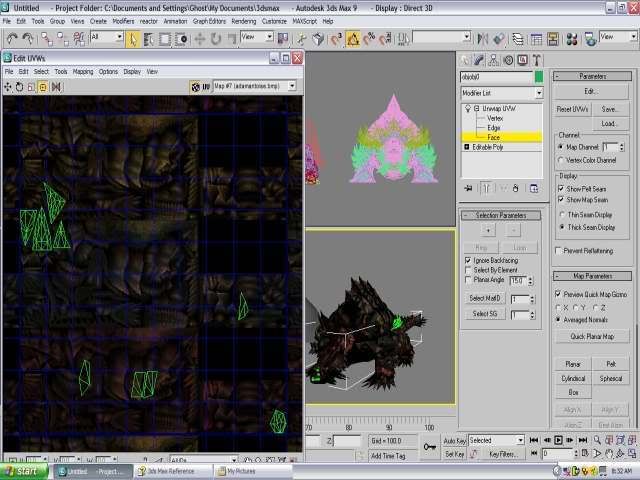
Now size then down to fit the correct texture like so. It doesnt matter if you dont have it on the right colour yet as that can be easily moved later.
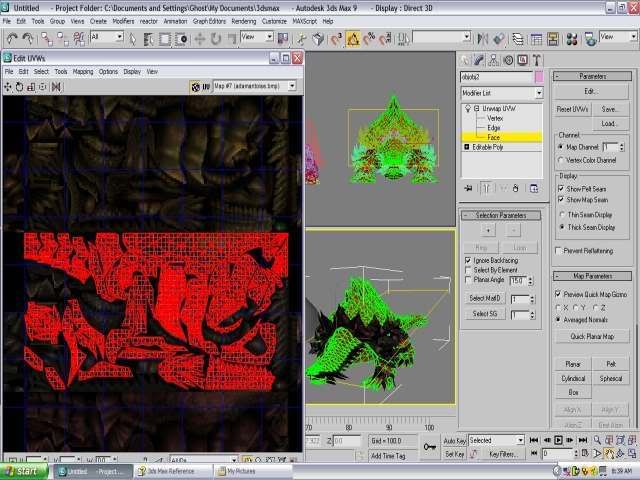
Now continue to do this until you have comleted fixing the UV's for all peices of the monster. Wich will take quite some time :lol:
After you have completed that, select the main body and select all the polys of the head up yo the neck like this.
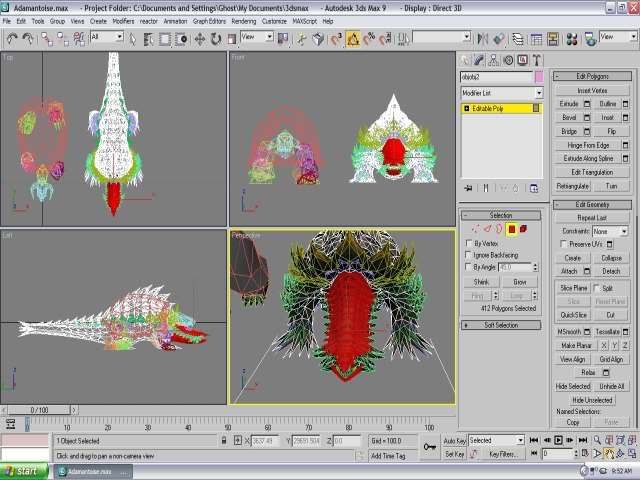
Now the normals problem isn't to bad on this model but to make things easier, selct each peice one at a time and delete one half of the polygons like so.
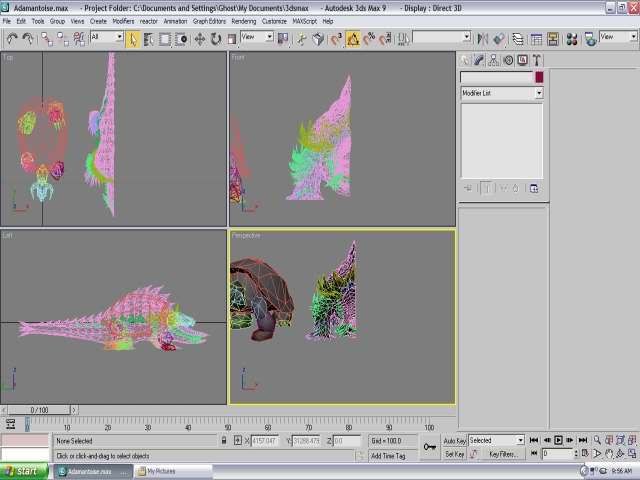
Select the peices that should be attached to the to the main body and attach them. Now hide unselected, you should just have a floating body now.
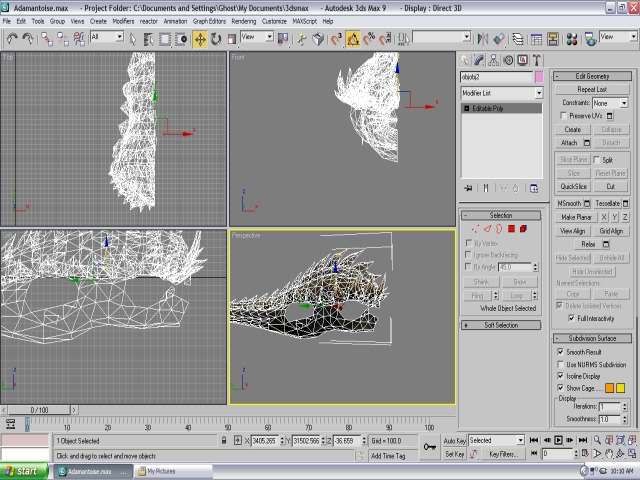
Now we want to plug those holes up in the side of the body. I'm not gonna tell you how to do this you need to know how to do this yourself.After you have done that its time to fix the normals. So using normals modifiers and flipping individual polygons you should be there for atleast an hour. Do a test render.
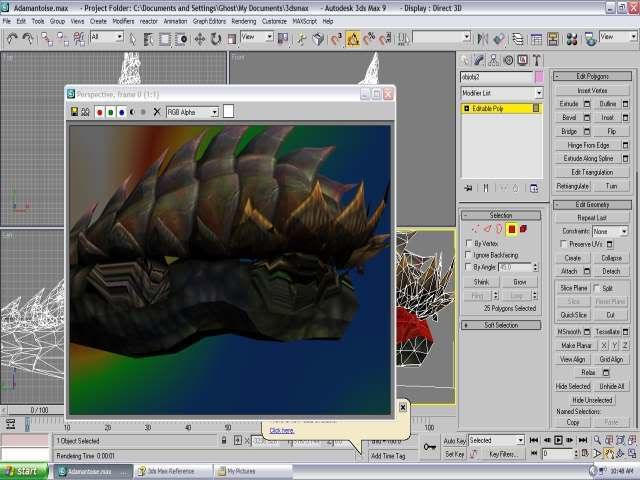
Convert all objects back into poly, now do another unwrap UVW's on the body andmove the uv's of the hole we just patched to the black area.Convert it back into poly once more, now go to mirror and copy.
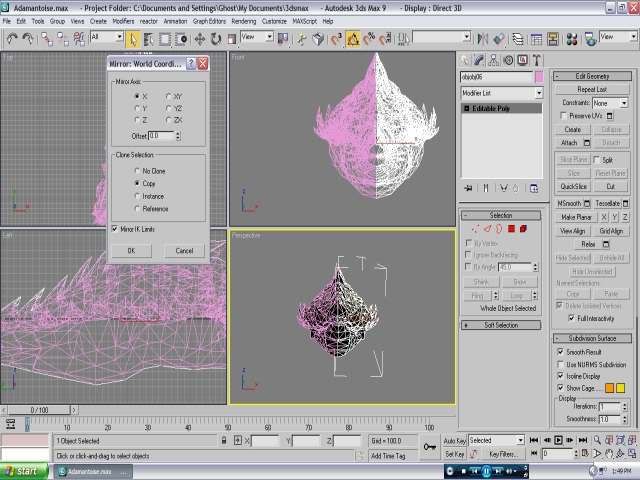
Select the vertices down the middle of the body and weld them together.
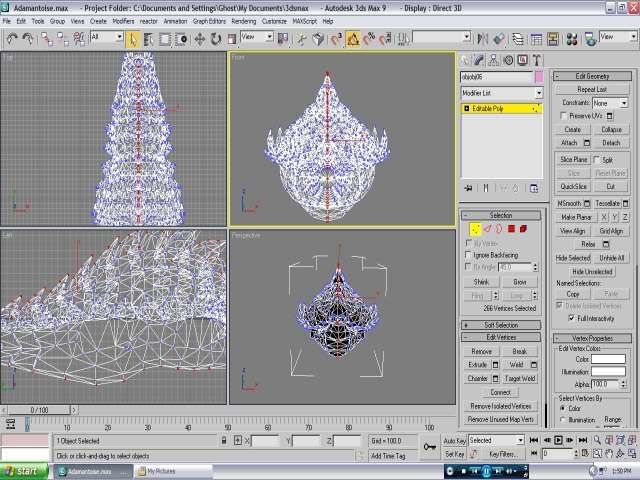
Unhide all and attach what should be attached to the head just like we did with the body. Also fix the hole in the neck on the body. Now back to the head proceed to fix normals just like we did with the body before mirroring it aswell and welding the vertices.plug the hole in the back of its neck and dont forget to make cuts along the way.Don't confuse cutting with slicing big difference.
Now select the head and make a quickslice about halfway down the head. Select half of the polys from where we made our quickslice and detach the object.
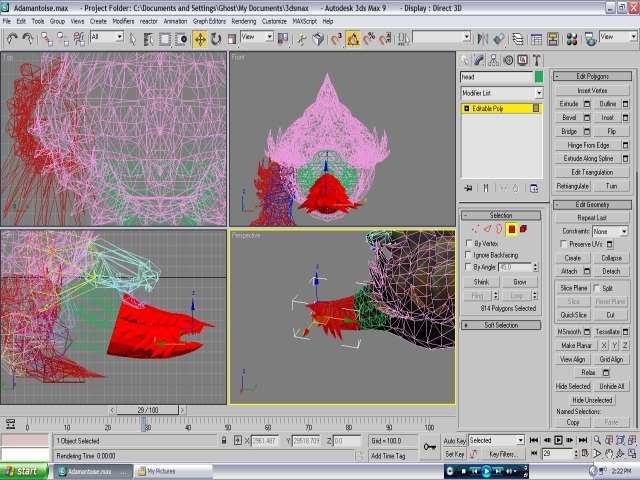
Now having a look at our other model we use as reference to see roughly were we need to slice.
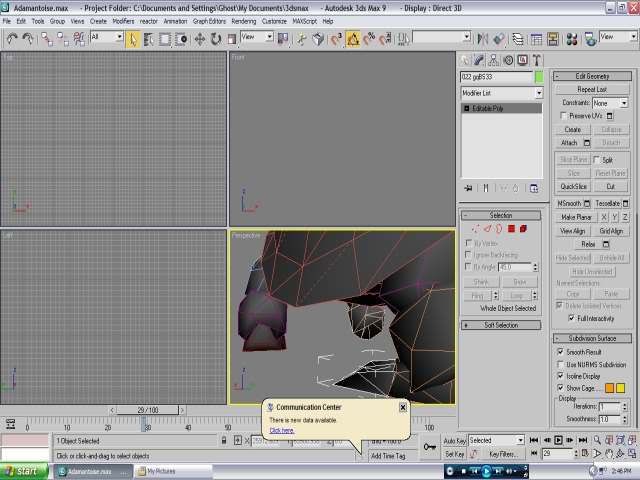
so start by selecting the claws and detaching them, no slicing needed.
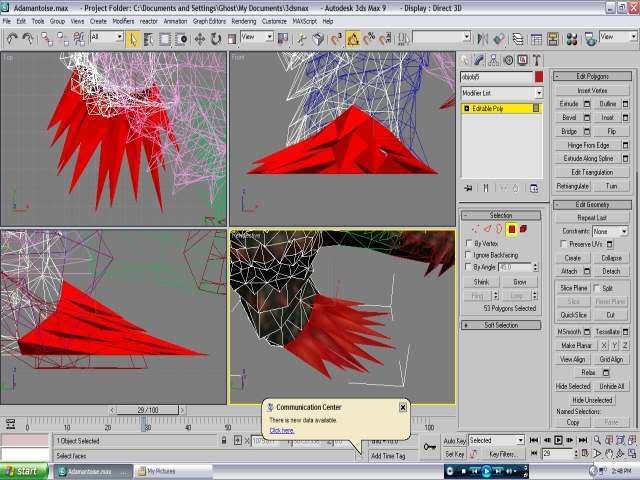
Oh yes don't forget to name everything as you go along or it may be confusing. Now we cant see the ankle to well so select the polys that are obstructing view and hide them.
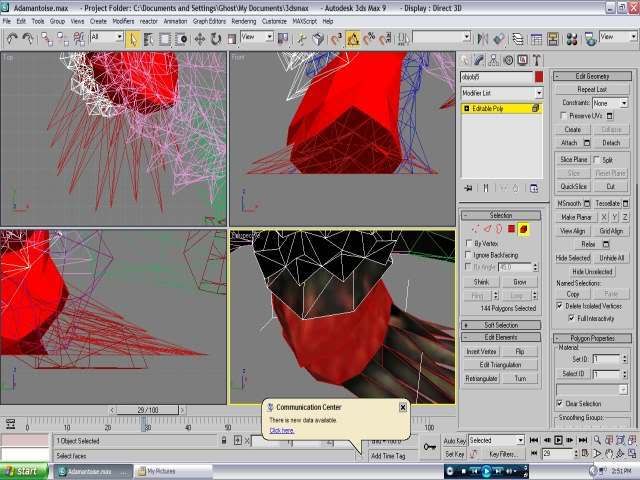
Now make a quickslice roughly where the ankle would be and detach it.
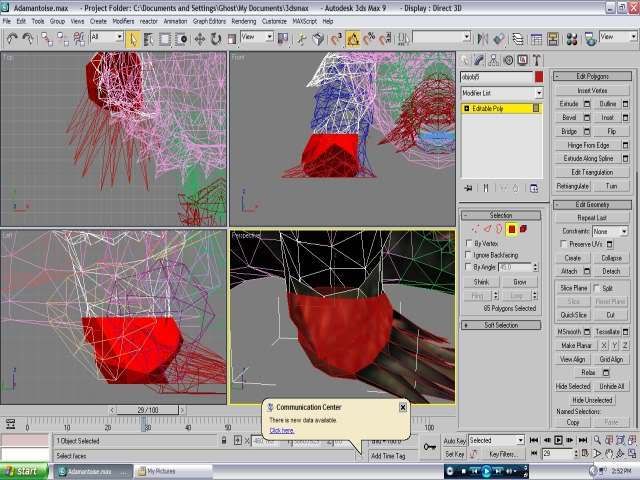
Now proceed to do so with the rest of the front and back leg. After doing so we need to plug the holes in ALL of the peices, I hope you named them accordingly :wink:. On the peices make cuts that all come to one point so we can drag it up slightly, this will decrease some of the gap.
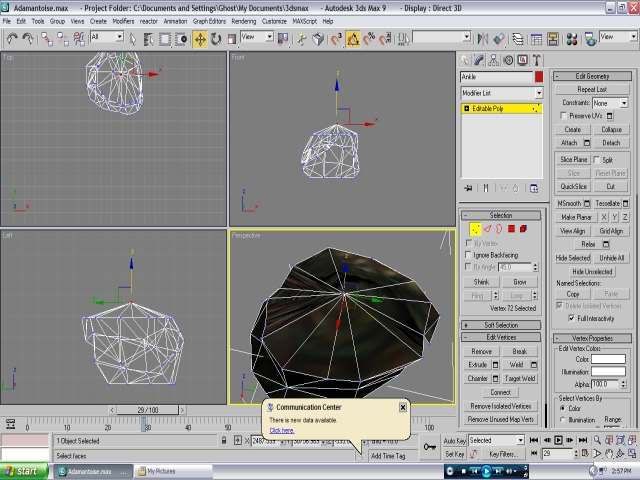
Now i leave you to do all that. Now when your finished it should look something like this. You should also have something close to the coresponding names, if you can make them out XD.
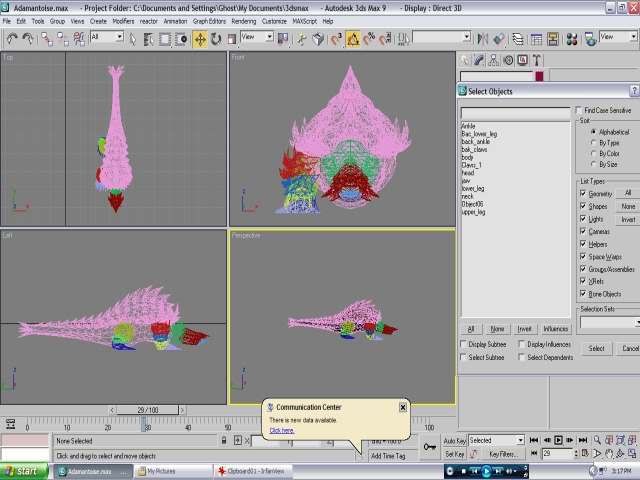
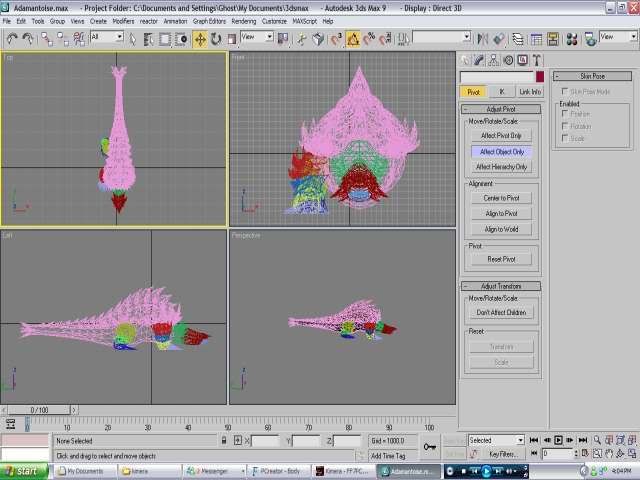
Delete the other models a we dont need it anymore and select all of the monster and drag him as close to the centre of the world as possible.
Now create a folder inside the export folder called adamantoise and select a piece and go file and export selected and name them accordingly.
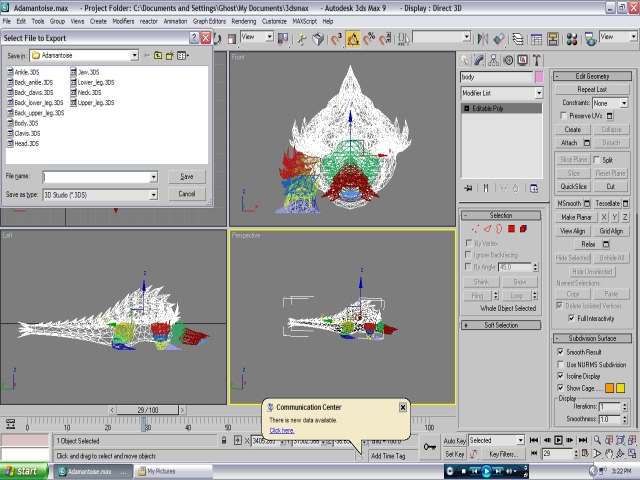
You have now completed the 3ds Max part of the tutorial congratulations :lol:.
 
Step 3:Converting for game use

Start by booting up Pc creator and oppening the body.Select it and make it smaller so you can see it on screen.
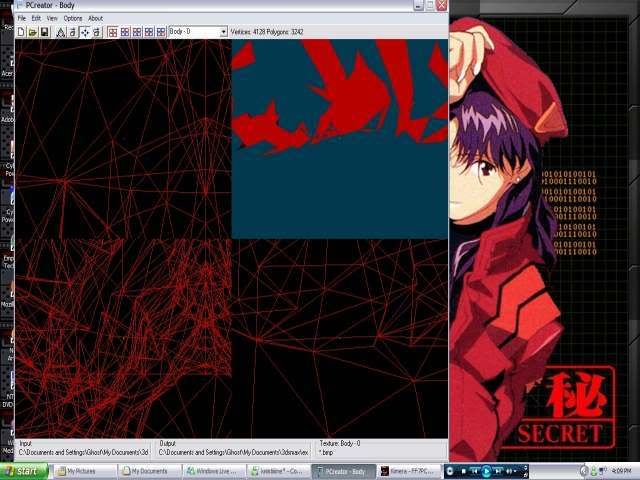
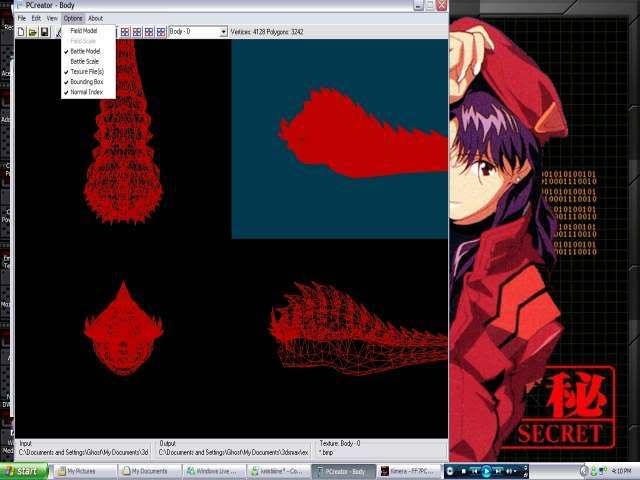
Now go to options and set it to battle model set the battle size to what you want and also tick texture file(s).
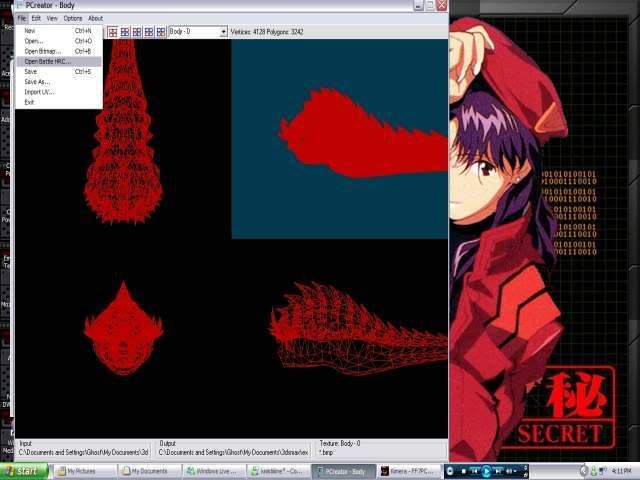
Go file and battle HRC and go to your folder with the the FF7 files and open gqaa, set the number of battle textures to anything over 1 in this case as we are only using one texture.
All your textures will be screwed up now , so go to view uvmap and flip the uv's on the y axis.
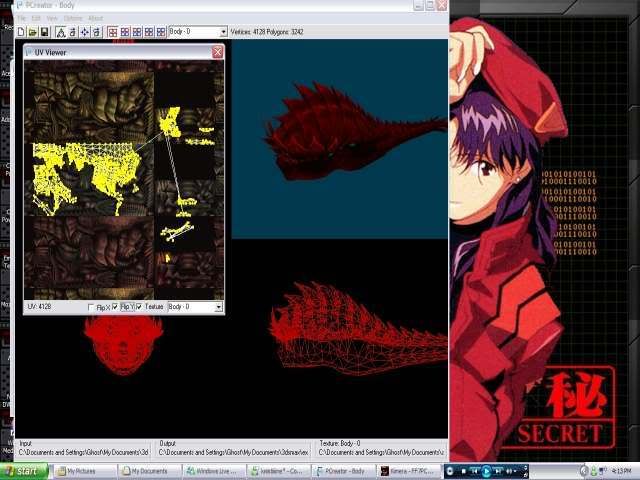
Now save it then go back to file and go save as. Make your way to the directory with the game files we will be swapping out and save it over gqam. now repeat this operation for all other files. To find out witch peice goes where you can either use biturn or kimera by clicking on the peice to open the .p editor and in the top left corner of the editor you will see the file name, so you know wich peice to save over witch file.
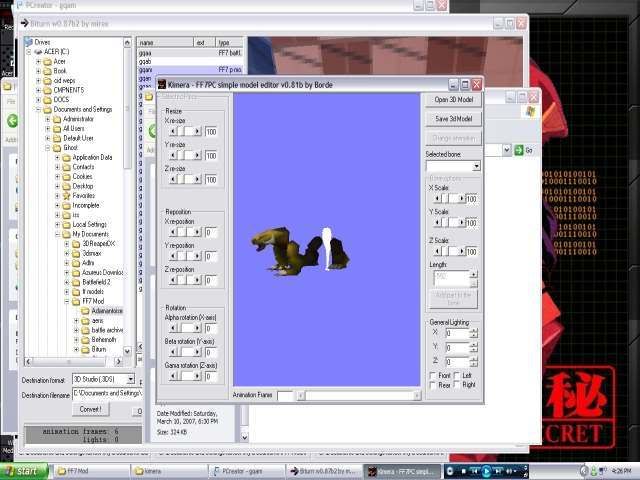
now grab your texture file wich will be saved in the same directory as the original .bmp  under the extension .tex. copy this into the adamantoise folder and change its name to gqac. Open kimera and you should have something that looks like this now.
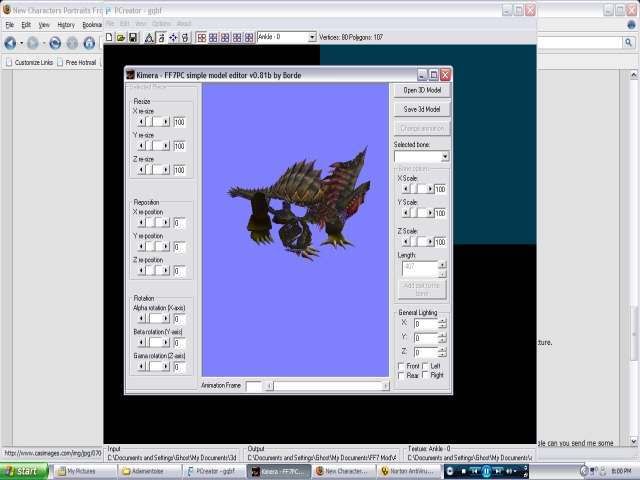
As for the front claws you can see they're in four different pieces. choose one to add your claw over and for the rest open them in the .p editor, and reduce the size of the piece on axis to 0 and save it, don't apply changes or kimera may crash. So dont forget to save every now and then to prevent data loss. Your fron leg should look something like this.
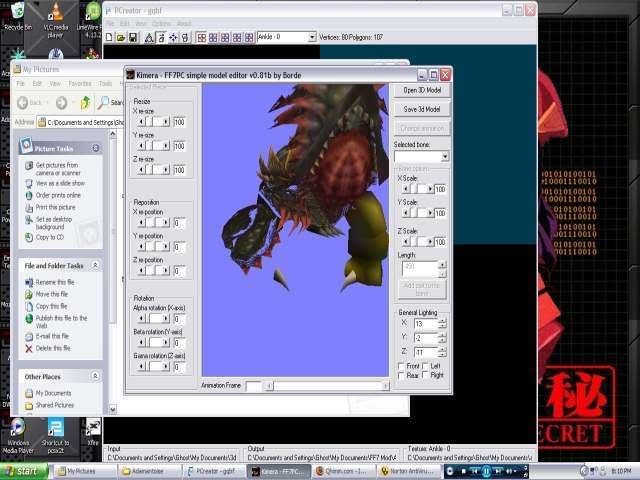
Once you have all your pieces together start moving pieces around and resizing them to fit. I started with the head.
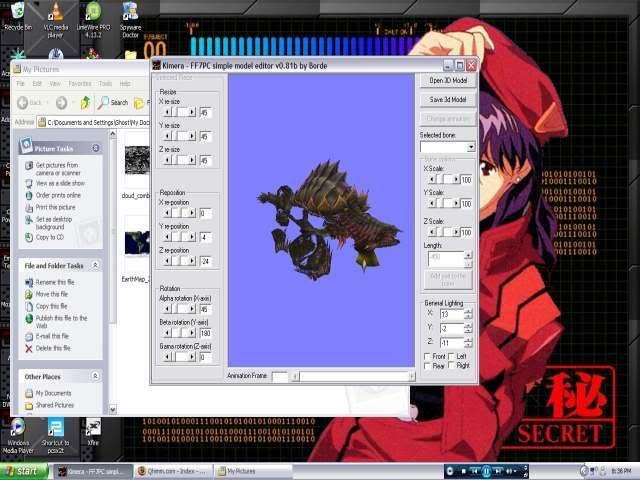
After moving everything around for a few more hours i got this.
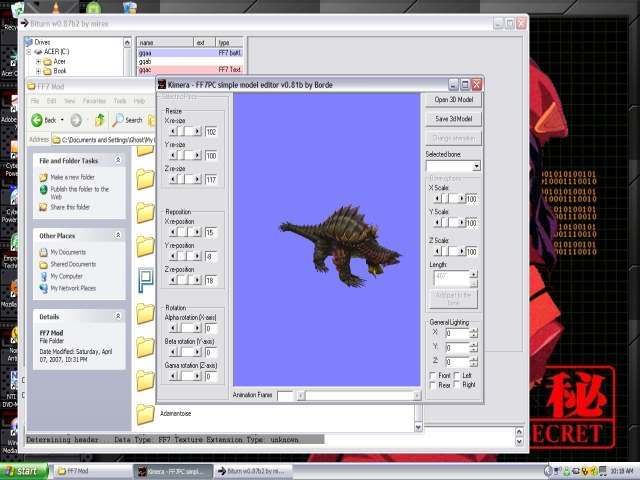
Now your probably wondering why i didn't do the other legs, easy solved by say clicking on the opposite claws finding out there file name, then going back to the other claws and flipping them horizontally and and saving them over the name of the other claw. Make sure you save them as battle model files or else it wont work.
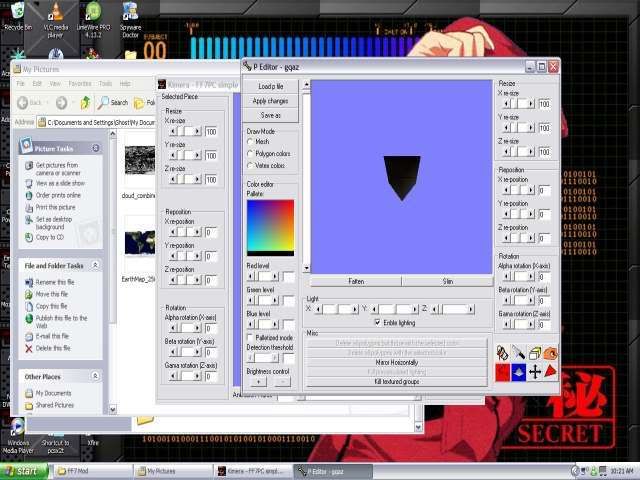
After screwing around with the other side for a while the legs looked like this.
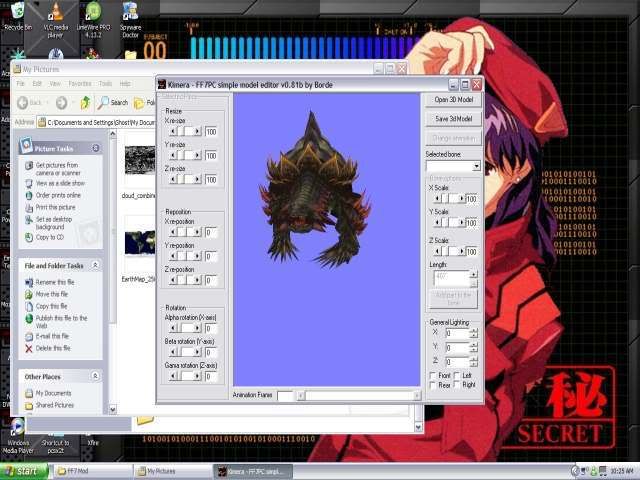
I know they dont look the best but they can be fixed later. Just save and close kimera.
Step 4:Compiling and playing

Last part nice and easy. Go to the adamantoise folder se;ect all files and copy them into the battle archives folder.
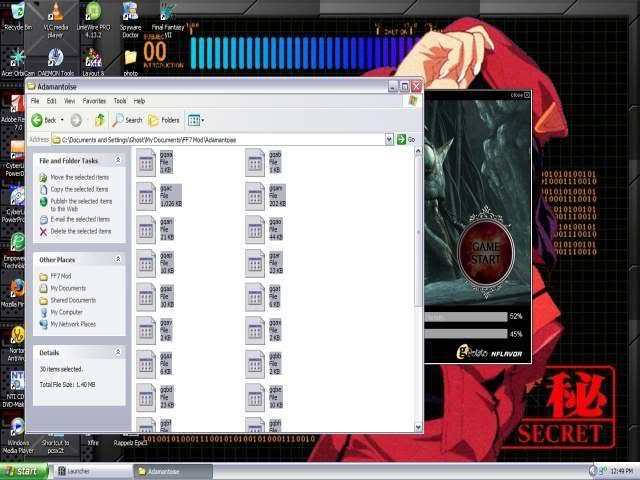
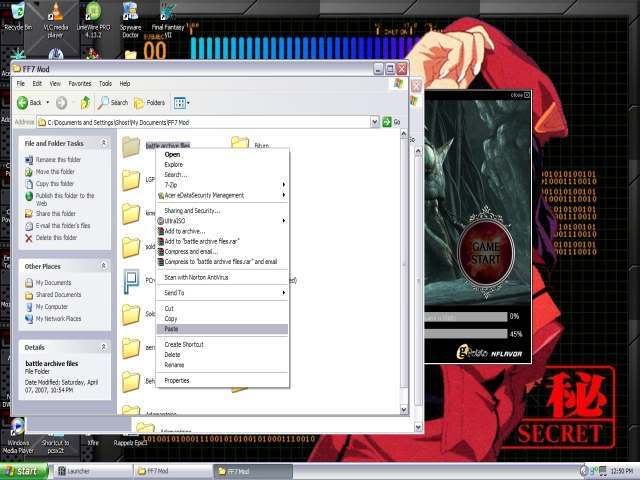
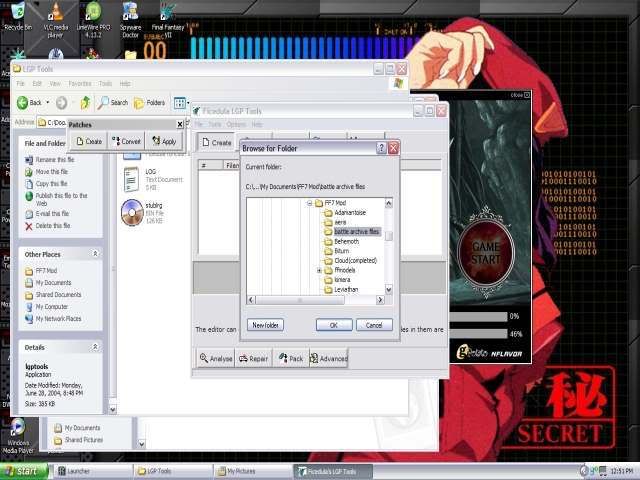
Bot up LGP Tools and go create, and select the battle archives folder and save the LGP file over your old battle one, Providing you already have it backed up.
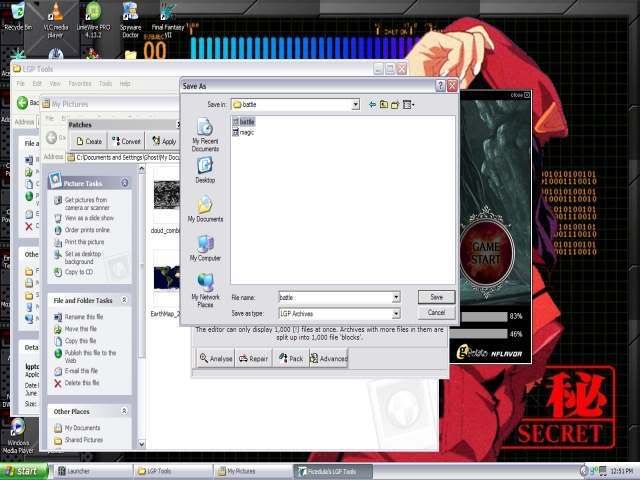
Now just boot her up and and shes ready.

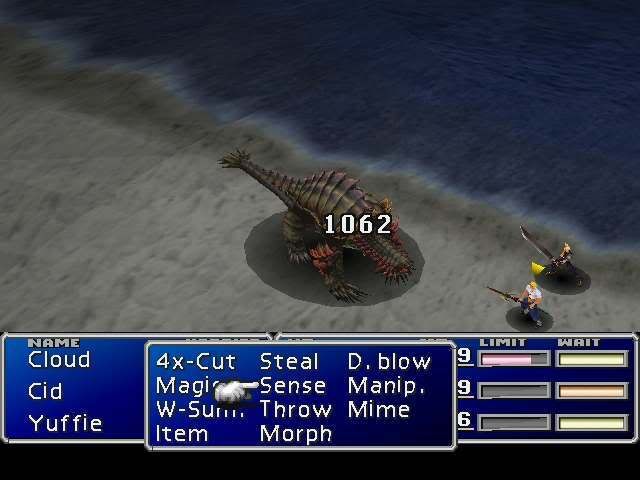
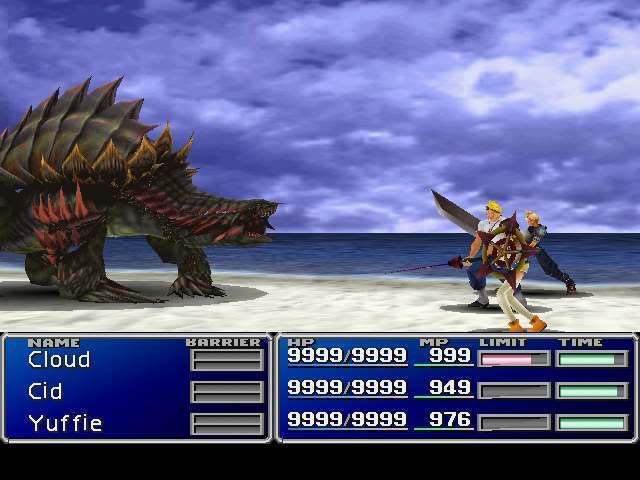
I know it didn't turn out properly but thats easy fixed later on.

So there you have it a start to finish guide on converting models into FF7, you can apply this knowledge to almost any other model aswell.
Big thanks to borde Reunion and yaz0r for there lovely programs. I don't know how many of you will still want to do this after seeing how much of a hassle it is but maybe you will appreciate my work more  :-P. Brain hurts sleep now. Give feedback.
« Last Edit: 2007-04-19 01:56:21 by squeeble »

ice_cold513

  • *
  • Posts: 494
    • View Profile
Re: Model conversion Tutorial (56K WARNING!!!)
« Reply #1 on: 2007-04-15 09:23:29 »
Very nice, lot's of step's and image's.


Good job

One-thing how did it take to-do?

squeeble

  • *
  • Posts: 423
  • GOOGLE GODDAMIT!!
    • View Profile
Re: Model conversion Tutorial (56K WARNING!!!)
« Reply #2 on: 2007-04-15 09:29:58 »
Um not to sure i know it would take me a 9-5 day to get it all done in one day, but i did this throught the course of the week and wrote the tutorial up in a few hours. So I would reckon 8-9 hours of work? So anyway I'll be posting up my "competition" soon and see who bites. I get the feeling after seeing this allot of people will be put off  :lol:.

Hyunckel

  • *
  • Posts: 183
    • View Profile
Re: Model conversion Tutorial (56K WARNING!!!)
« Reply #3 on: 2007-04-15 23:09:06 »
wow that's great, didn't understand everything (my 3dsmax 7 is french ... ) but i understand most. Thanks for you to have shared your work with us.
It's a shame no more people post feedback, but they somehow just already know that? or just don't want to "waste" their time in that !  :?

Thanks again man!

squeeble

  • *
  • Posts: 423
  • GOOGLE GODDAMIT!!
    • View Profile
Re: Model conversion Tutorial (56K WARNING!!!)
« Reply #4 on: 2007-04-15 23:12:21 »
Well i thank you for your feedback then. I forgot to thank square for there lovely models also, of wich i then butcher and convert them to a compatible format XD.

Hyunckel

  • *
  • Posts: 183
    • View Profile
Re: Model conversion Tutorial (56K WARNING!!!)
« Reply #5 on: 2007-04-16 05:07:08 »
one thing i didn't understand:

Quote
To do this we create a new image in photoshop, we want all the photos to fit squarely so make it 768x768. Then go file and place each of the files individually.

Until you get this.

Where did you get that pictures, also how many are there? I have FFX in my dvd lector, but before dumping it with raz0r 's tool, how will i know which one it is?
Because i assume these pictures are  not ff7 textures.

Also , you said, file place. But in place it says "placable files" of extension i don't know "psd", etc (except there is pdf?) ... So dow i use just bmp 256colors created by 3dsmax using dds textures of the ff10 model?

Sorry but for you it seems simple and esay but for me ... no lol

squeeble

  • *
  • Posts: 423
  • GOOGLE GODDAMIT!!
    • View Profile
Re: Model conversion Tutorial (56K WARNING!!!)
« Reply #6 on: 2007-04-16 05:45:13 »
Um I know you said english isn't your first language so I wont be mean, but I don't think I understood any of that???

Rancid Cheese

  • *
  • Posts: 68
  • Uhh this Cheese ain't fresh at all!
    • View Profile
Re: Model conversion Tutorial (56K WARNING!!!)
« Reply #7 on: 2007-04-16 11:31:09 »
Well I'm well up for giving this a go!

"He who dares wins"

Well unless he loses . . .  :-P

Qudeid

  • *
  • Posts: 74
    • View Profile
Re: Model conversion Tutorial (56K WARNING!!!)
« Reply #8 on: 2007-04-16 18:13:07 »
Squeeble, I don't get this Photoshop part either.
It complains about wrong file-extension or incompatible files... (If I want to place...)ookay.. now I was really stupid.. I wanted to put the FF7 files in that one.. Okay, I shouldn't do that.. but which files then? I have a bunch of ffb files from the Rip, but which one to use etc?

Hyunckel

  • *
  • Posts: 183
    • View Profile
Re: Model conversion Tutorial (56K WARNING!!!)
« Reply #9 on: 2007-04-16 19:28:42 »
Squeeble, I don't get this Photoshop part either.
It complains about wrong file-extension or incompatible files... (If I want to place...)ookay.. now I was really stupid.. I wanted to put the FF7 files in that one.. Okay, I shouldn't do that.. but which files then? I have a bunch of ffb files from the Rip, but which one to use etc?

You can convert dds textures from ripped (by 3dripper dx) models in 3dviewer (by yaz0r)  in 3dsmax to psd (or esd don't remember) and that format is used by photoshop when you /file/place .

Don't know if it is of any use , especially as it seems nobody seems to understand what i mean  :?

Um I know you said english isn't your first language so I wont be mean, but I don't think I understood any of that???
Okay i modify that:

one thing i didn't understand:

Quote
To do this we create a new image in photoshop, we want all the photos to fit squarely so make it 768x768. Then go file and place each of the files individually.
Until you get this.
This is quoted from your photoshop paragraph, about placing files on a 768*768 pixels square file. But when attempting to "place" files, no extensions seem to be correct, i use jpg and bmp . SO i assume you have to use special format ( converted before) but you don't say any word about it...

Where did you get that pictures, also how many are there? I have FFX in my dvd lector, but before dumping it with raz0r 's tool, how will i know which one it is?
Because i assume these pictures are  not ff7 textures.
I meant, do you get that pictures to place , with the 3D model from FFX? If yes, which one file it is? You gave the name for FF7 , but i assume it isn't the same in FFX?

Also , you said, file place. But in place it says "placable files" of extension i don't know "psd", etc (except there is pdf?) ... So dow i use just bmp 256colors created by 3dsmax using dds textures of the ff10 model?
Already explained above.

Sorry but for you it seems simple and esay but for me ... no lol
Meant "easy" , but i think you undersatnd that point  :-D

Hope i made this clearer.
« Last Edit: 2007-04-16 19:33:24 by Djé »

Qudeid

  • *
  • Posts: 74
    • View Profile
Re: Model conversion Tutorial (56K WARNING!!!)
« Reply #10 on: 2007-04-16 21:14:06 »
Well I did rip them yazor's ffx dumper... so I have I bunch of ffb files.
What do I do with them. I can view them in yazor's modelviewer, but this one is only to view models nothing can be extracted (as much as I found there).
So basically I have no clue about what to do. (Your explanation, I didn't understand).

I mean to criticize this Tutorial... well, you intend this to be a tutorial, yet some things are just missing. I know you wrote decent 3ds knowledge... but you talk about textures and placing files somewhere where I don't know where they should come from. Correct me if wrong?

squeeble

  • *
  • Posts: 423
  • GOOGLE GODDAMIT!!
    • View Profile
Re: Model conversion Tutorial (56K WARNING!!!)
« Reply #11 on: 2007-04-16 23:29:21 »
Ok my bad i should of stated that i wasn't going to put any ripping knowldge into this because the FFX-X2 .ffb-.obj converter is illegal so i cant give any information on this. So if you want to rip these GOOGLE!! is your freind, I discovered everything i have through google through searching the searching forum topics and research. As fo rthe photoshop part its very straight forward. You create a new image and place all your texture files in it how hard is that to understand?

SmasherHell

  • *
  • Posts: 9
    • View Profile
Re: Model conversion Tutorial (56K WARNING!!!)
« Reply #12 on: 2007-04-17 00:06:43 »
It's just wonderful, great tutorial, the final model in game looks marvelous ^^ thank you for this work...well I guess after the NPC reconstruction project, the Batlle model enhencing project will begin =) or that would be great (taking model from FF8 to 10)

Hyunckel

  • *
  • Posts: 183
    • View Profile
Re: Model conversion Tutorial (56K WARNING!!!)
« Reply #13 on: 2007-04-17 03:47:18 »
Well I did rip them yazor's ffx dumper... so I have I bunch of ffb files.
What do I do with them. I can view them in yazor's modelviewer, but this one is only to view models nothing can be extracted.

Use 3DRipperDX to "rip" 3D Models viewed by the 3D D9 viwer of raz0r.
http://www.deep-shadows.com/hax/3DRipperDX.htm

But when ou choose rip all textures, you 'll have dds files. which can be converted by 3dsmax into other files (such ones like required by photoshop to "place")
But i still don't know why 768*768pixels wide for the new file in photoshop, nor how squeeble did import them (the textures files) and precisely place them to fit, cause when i'm trying to with a character of KH1 for exemple, the textures are much smaller, but i guess there is no upside down in placing all the textures, cause the "unwrap UV " modifier in 3dsmax replace them correctly on the model (i think, cause i'm not good at 3dsmax, and furthermore, mine is in french , and there are 4 options with UV in modifiers) ...

Hope i helped you  :-)

squeeble

  • *
  • Posts: 423
  • GOOGLE GODDAMIT!!
    • View Profile
Re: Model conversion Tutorial (56K WARNING!!!)
« Reply #14 on: 2007-04-17 04:26:53 »
Well i stated specifically unwrap UVW's it says it right there in the modifier list, as for the 768x768 that was just for this particular model. Most models i use 512x512 and i really dont understand how you can't figure out how not to place files in a scene no offense. When i can be bothered I'll put up links to the higher res images so maybe you can read the text better :lol:..

Qudeid

  • *
  • Posts: 74
    • View Profile
Re: Model conversion Tutorial (56K WARNING!!!)
« Reply #15 on: 2007-04-17 04:40:34 »
Thanks squeeble, that cleared my confusion..

And thanks Djé for your little "tutorial" will get right into it, once I'm home again (I hope).

As for unwrap UVW... why don't you look it up in a dictuionary and compare it with what you have in max? I remember my Max (being german), having unwrap UVW in it... I can't see a point in translating these, because such tools should be almost identical so you won't have much problems in working with them etc. I mean, conversation between languages. (Actually, I'm pro leaving such tools (okay way more than a tool) international, thus english)

Edit: I couldn't find any import thingy in max to convert the dds files.. but I found a plugin from nvidia for photoshop to read and write dds
« Last Edit: 2007-04-17 10:15:07 by Qudeid »

Qudeid

  • *
  • Posts: 74
    • View Profile
Re: Model conversion Tutorial (56K WARNING!!!)
« Reply #16 on: 2007-04-18 14:56:18 »
Yikes... I've come to unwrap UWV... Sheesh, how am I supposed to know where to put those faces? All my faces look totally different to you ones in your Picture Squeeble.. Well I quess I should just let it go, huh?

Hyunckel

  • *
  • Posts: 183
    • View Profile
Re: Model conversion Tutorial (56K WARNING!!!)
« Reply #17 on: 2007-04-18 15:17:21 »
I installed 3DSMax9 (english version) and when it comes to rendering/material modifier , then i don't find how to apply my 2048x512 bmp 8bits made earlier, i can choose it but then, there is no "apply" button lol :-D
Ho, I know i'm a crap at this software lol so don't come to say "do some tutorials" as i have no time to do them . If you can put one or two screens or links to them (high res) to shom what i mean , then thanks alot, if not, nevermind i gave up this project for now (lack of time)  :cry:

Qudeid

  • *
  • Posts: 74
    • View Profile
Re: Model conversion Tutorial (56K WARNING!!!)
« Reply #18 on: 2007-04-18 18:08:36 »
You drag&drop the material to your Adamantoise (which has a UVW Map on him). I did after I grouped all parts of the model. Was it what you asked?. You can't get the Material on your Model, right?

Edit: I actually expected you to lecture me.. hehe. But hey, Djé, It is not that difficult where you are.. It just gets more difficult. Oh and another question, is there a way to stop the animation of the Adamantoise in the Modelviewer? I mean, is there a "stiff" model? I couldn't find any (actually, I didn't search.. hehe)
« Last Edit: 2007-04-18 18:13:17 by Qudeid »

Hyunckel

  • *
  • Posts: 183
    • View Profile
Re: Model conversion Tutorial (56K WARNING!!!)
« Reply #19 on: 2007-04-18 22:00:59 »
is there a way to stop the animation of the Adamantoise in the Modelviewer? I mean, is there a "stiff" model? I couldn't find any (actually, I didn't search.. hehe)

Ddn't understand all you said. But i'm not a profesionnal 3dsmax user, and haven't it right now, i don't know all the features by heart.
For your question, i don't know for FFX, but as for KH1,2 , there are animation files and still "sprites" normally.

squeeble

  • *
  • Posts: 423
  • GOOGLE GODDAMIT!!
    • View Profile
Re: Model conversion Tutorial (56K WARNING!!!)
« Reply #20 on: 2007-04-18 23:15:04 »
Qudeid when you say group i hope you don't mean joined them all together, coz if yes you are boned rofl.. As for the animation thing it should already be in a static pose rather than animated. Now at the top of the tutorial it says you need a decent knowledge of max when i say decent I've been using max for 9 months now gradually learning as i go along, this tutorial isn't aimed at noobs so if you don't have time to do tutorials you probably wont have time to do this, i would definitely recommend the Max tutorials from 3D palace as they taught me most of what i know. You need basic modeling skills very basic mapping skills but you need to know enough about UV maps to know what your looking at.
**EDIT** It shall be done
« Last Edit: 2007-04-19 01:55:43 by squeeble »

Hyunckel

  • *
  • Posts: 183
    • View Profile
Re: Model conversion Tutorial (56K WARNING!!!)
« Reply #21 on: 2007-04-19 00:29:55 »
Qudeid when you say group i hope you don't mean joined them all together, coz if yes you are boned rofl.. As for the animation thing it should already be in a static pose rather than animated. Now at the top of the tutorial it says you need a decent knowledge of max when i say decent I've been using max for 9 months now gradually learning as i go along, this tutorial isn't aimed at noobs so if you don't have time to do tutorials you probably wont have time to do this, i would definitely recommend the Max tutorials from 3D palace as they taught me most of what i know. You need basic modeling skills very basic mapping skills but you need to know enough about UV maps to know what your looking at.

Yeah i went some hours on 3Dtotal, and i learned easily how to UV Map and Unwrap UVs ... It's easy afterall, but long and tedious to set uvs for each parts ....
I prefer playing games to wasting time to enhence them ^^

EDIT: You should have written in the thread title "Not for NOOBS!! VERY decent knowledge needed!"  :-D
« Last Edit: 2007-04-19 00:31:40 by Djé »

Qudeid

  • *
  • Posts: 74
    • View Profile
Re: Model conversion Tutorial (56K WARNING!!!)(Not for Noobs)
« Reply #22 on: 2007-04-19 06:39:17 »
With group I meant selection group. There is a command like this in the menu. Oh I have Max Knowledge. It's just that I haven't used it in a while (Began with max two years ago, or so, might be even more).
About the animation. In max, it is logical that it is not animated, you meant that. I mean in the Modelviewer where I put my ffb file. It immediately animates once I put that file in there. In a little window it shows me Animations(4). And there are about 20 Animeations listed.
If the Adamantoise moves, it is not so easy to get him to look like yours, squeeble. Should I stop trying to do this? Probably, but I won't.

squeeble

  • *
  • Posts: 423
  • GOOGLE GODDAMIT!!
    • View Profile
Re: Model conversion Tutorial (56K WARNING!!!)(Not for Noobs)
« Reply #23 on: 2007-04-19 06:57:18 »
Well either use the old FFX model viewer or find the conversion tools, witch I won't give a link to as they are illegal. Remember google is your friend :-)

Hyunckel

  • *
  • Posts: 183
    • View Profile
Re: Model conversion Tutorial (56K WARNING!!!)(Not for Noobs)
« Reply #24 on: 2007-04-19 08:58:50 »
Well either use the old FFX model viewer or find the conversion tools, witch I won't give a link to as they are illegal. Remember google is your friend :-)

There is no more FFX viewer nor dumper i told you on MSN, if there was , indeed the guide to convert models to OBJ files would be ready for  everyone. That's why i used Yaz0r 's modelviewer (the only and last one, all others have been taken down) , viewing a model, then ripping it with 3DRipperDX .